Showing posts with label diy. Show all posts

Weekend Project - Mini Cornhole

Somehow I completely escaped cornhole while in college. I must have seen people playing it, but probably thought it looked a bit too silly to play myself. One of my friends in grad-school had a set, however, and I gave it a try.

Turns out I'm really good at throwing a beanbag into a hole - and had a good deal of fun doing it.

So this weekend I set out to make a set of my own! I had some plywood lying about, so that set the dimensions of the boards to 20"x13" (which is pretty close to the golden ratio). I used two 7" sections of my favorite 2"x2" furring strip for the legs.

The recipe is simple enough: Slice off the sections with the jigsaw, then drill a hole big enough to get the jigsaw blade into and spiral out until you can cut out the center hole.


I measured out the center of the hole, and then used an old lid (a paint can could work as well) to mark a circle. You can center the circle by making tic marks the radius away in the horizontal and vertical directions. Line up the edges of the circle with those marks, and it should be centered.

I drilled a hole large enough for the jigsaw blade and then spiraled out to cut the hole out. Be careful and take your time during this part, since it's largely freehand, it's also VERY dangerous!


Sand everything down so there are no edges to get splinters from. That would put a damper on your fun!

Onto painting! The photos are a bit out of order - I hadn't charged my drill - and I got a head start on painting before finish the cuts. There are some tricks that can make the painting go easier. I was going for a three-tone design, with two lines leading up to the hole. First I laid down a strip of painters tape for where I wanted the line to go, and painted around it.


Running a razor blade (or x-acto knife) along the edge of the tape helps it peel up without dragging the paint up with it.


I also used the x-acto knife and the lid I drew the circle with to cut a nice circle out of the ring of tape around the edge. This left a nice circle when I painted the highlight strips.


Finally, attach the legs with a couple of screws (this prevents them from rotating). Don't forget to counter-sink the screws, so you don't have the heads sticking up waiting to catch someone's finger.


You may have to do some touch-up work, but we're done with the boards. Now onto the bags.

I used some split-peas for filler, as they have a nice smooth feel to them (it must have looked pretty strange to see me feeling up all the beans in the store). I measured out ~5.3 oz as a good weight, which used 2 16oz bags of beans for the 6 bags. As you can see, I was very careful about measuring out the beans :p.


Finally, we used some old cloth we had lying around for the bags, which are sewn just like a pillow - inside out and the flipped, filled, and sealed.


All done! Grab a cold soda and enjoy your handi-work.


Tools:
  • Jigsaw
  • Hand drill
  • Sandpaper
  • Painter's tape (optional)
  • Paintbrush
  • Coutersink / drill bits / screwdriver bit
Supplies:
  • Plywood (spare, probably ~$10)
  • 2"x2" furring strip ($2)
  • Screws (8x ~$5 for a large pack)
  • Paint (I used some old latex paint we had lying about ~$5)
  • Cloth (spare, ~$2)
  • Beans ($4)
Total: ~$28


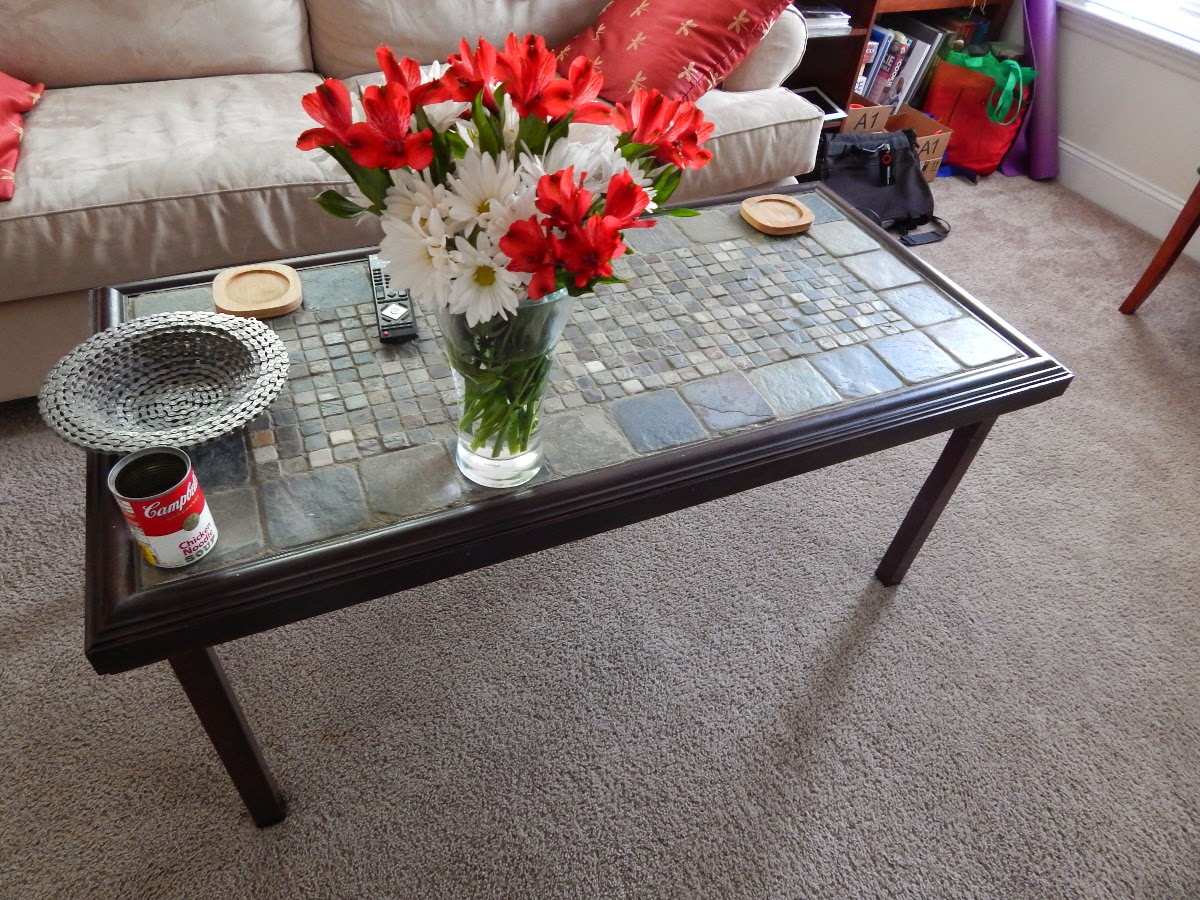
The Coffee Table

From the archives: Here's one of our first projects, a coffee table. The apartment had this incredible empty space between the couch and the TV, plus there were absolutely no flat surfaces on which to rest anything. While I was going to go for the eminently practical plywood on my favorite 2x2 furring strips, the better half convinced me to make it a bit more artistic. Together we browsed through the hardware store and found these fantastic tiles. After about a month of hard work, we ended up with this table:


As far as construction goes, there's a plywood surface, under which there is an open frame of furring strips, with the four legs going into the corners and reinforced / held into place with an angled strip:


On the top, we boxed in the center with some trim, then smeared out the tile adhesive, placed the tiles down and added all the grout. Unfortunately one tub of grout didn't quite cover it, and we had to go back for another tub.


Also, the tiny tiles are horrible to grout, they take forever. We also went ahead and sealed the grout to help protect the surface. The final product was well worth all the effort. We think it's a fantastic table and one we'll certainly have for awhile.

Tools:
  • Miter box and saw
  • Screwdriver / drill
Cost:
  • Tools: $20
  • Supplies: $150
  • Total: $170

Weekend Project - Floor Lamp

I've wanted to make a Japanese-themed floor lamp to go in our reading nook for quite a while now, and finally got off of my rear to do it. I'll lead off with the beauty shot of it in place, because it really is quite nice.


I wasn't able to find 1"x1" wood anywhere (the actual dimensions are closer to 3/4" square), so I had to cut a 2"x1" in half the long way. I wanted a lamp that would be 4' tall, and around 8" wide. These measurements worked out perfectly, as with one 12' section of board, I was able to cut out 4, 4' lengths for the corners and 12, 7.5" lengths for the lattice.


After a quick stain, I hot-glued each of the four corners with the three of the connecting pieces, and then nailed them together. Two of the corners were then combined, so I had two components of one full side and one partial side.


The longest part of this project was trying to find some good paper. I could only find industrial size sheets of Japanese rice-paper, and eventually settled on tracing paper. The tracing paper worked out very well in the end. With the paper selected, I just hot-glued it to each of the two complete sides.


Next up, the sides were joined together with a cross bar formed from a dowel running through the center. This will allow us to hang the bulb for the lamp.


With that done, the next two sides were covered with paper (the final side is quite difficult once the other three are covered). And you can see that it lights up nicely.


Back to the saw and staining to cut some trim for the base.


With that glued together, the final segments of the paper go in, and we're done.


Here's a cool looking view from the top.


That covers the structure of the lamp. Just as important is the electrical component. This isn't too difficult; it comprises of an electrical cord, a switch, and a socket. I thought I would try something different here, and made a video of the wiring process. Remember to use all safety precautions.


This project was fairly easy and straightforward. Having done it there are a few things I would have done differently, however. Mainly, I would have used a few more cross supports. This would have meant that the windows would have been smaller, which would have made it much easier to find paper to fit (I could have gone with the next size down, rather than the largest tracing paper size). If you look closely, you can also see that for the lowest window, the paper is glued to the base. Again, if there were more cross beams, I could have placed one at the base as well. All in all, you can't tell unless you know what to look for (so perhaps I shouldn't have told you ;) ), and I'm very pleased with the glow it gives the reading nook.

Here's the breakdown:
Costs:
  • $19 - Wood
  • $5 - Stain (I ran out of the old stuff)
  • $8 - Electrical bits & pieces
  • $13 - Paper
  • Total: $45
Tools:
  • Jigsaw
  • Random Orbit Sander (only because I had to slice the wood in the beginning, you could do it all with pre-sanded trim)
  • Miterbox & handsaw
  • Nailgun (I wish, this would have made it so much easier to do the frame)

Weekend Project: Tablet Stand

I added a new tablet to the family, and thought that it was about time I came up with a stand so I could use them while typing. So with a bit of scrap wood and a few quick cuts I was able to whip one up in no time. It works great for both the Galaxy Note 10.1 and for the Nook Color. The stand is only about 4.5 in long and very lightweight. Here's the story;

Here's the basic design. A few slivers of plywood held
together with glue and dowels.

The side-view. You can see the design sketches below.

Making sure that it will fit the tablet.

A layer of spray-paint goes a long way

You can see it holds the Note 10.1 nicely.

It also works great for the nook!

Here's the side view, and you can see that it holds
the nook comfortably in landscape and in portrait mode.

The Galaxy Note 10.1 barely fits is portrait mode too.

Weekend project: Bluetooth Radio

Perhaps you may have seen these bluetooth powered speakers popping up around. Well, I had an old bluetooth headset that was sitting in my 'junk electronics' drawer, and I thought it would be fun to turn it into the receiving end of a bluetooth speaker system for the house. You may need an app such as btmono to play music to a mono (as opposed to stereo) headset.

The parts we'll need. Headset, audio jack, and splitter.

After trying to remove the case for an hour,
it was simpler to dremel off the speaker section
and get at the wires that way.

Testing it out with the audio jack.

Finally, I've hot-glued everything in. I would recommend
hot-gluing over the exposed leads so you don't get
speaker pop when plugging in the speakers.

Weekend Project - Photopopper

One of the current geek things to do is see what you can fit in an altoids tin. One of my friends had a similar tin that I was playing with awhile ago. He saw me playing around with it and challenged me to come up with something.

Well I've failed. It doesn't fit in the tin.

But it was still great fun to work on! And it's the perfect weekend project.
So what am I talking about? It's Solarbotics BEAM photopopper photovore. That's a mouthful, so let's break it down; it's a robot that follows the light. I got the design from the Solarbotics page, where you can buy a kit from them, although I just purchased the components on my own, as I wanted to fit them in the tin. 

Here's the picto-breakdown - scroll all the way to the bottom for a video!

It's best to build the circuit on a prototyping board to
make sure everything works. If not, it's easy to fix here.

Once it's working, you can solider it together.

Finally, we use some double-sided tape to attach the shell.


The tabasco robot! It's hard shell protects
it from many natural predators.

Mobile

Everyone picks up seashells from the seashore, right? Well we did to thinking we would make a mobile out of them. Fast forward two years and we finally got around to making it ;)

The easiest way of finding the balanced midpoint is to put each of your index fingers at opposite edges of the stick, then move them inward. Volia! They arrive together at the center of mass.

Just a nicely balanced collection of seashells.
And the close-up.

'Origami' Bookshelf

If you haven't seen Frank Lloyd Wright's Origami chair, you should. Legend says each chair comes from a single sheet of 8x10' plywood cut and remade into a chair. Needless to say I wanted one as soon as I saw one. Unfortunately they're not for sale :(

So I did what I could. Inspired from the chair I decided to start a bit smaller with my own 'origami bookshelf' from some leftover wood.

We'll start by slicing the old piece of leftover wood in half. One half goes to the shelves and the other to the legs. Then we'll cut slots halfway through so they can slot into each other. There are some small adjustments I had to make as I went on, but I'll let the pictures speak for me.

The leftover wood piece.
Marking up the slots.
After the cuts.

Checking that everything fits.

The pieces individually.

Assembled lying down.

Assembled standing up. There is a bit of a tilt to the setup, 
resulting in a leg being trimmed towards the end.
Also I thought that the second shelf angled with respect to
the first and to the ground.

Prepping for the stain.

Turns out stain can polymerize if
left exposed to air and alone.


Done with staining, you may have noticed an extra piece.
The extra piece helps maintain the shelf separation.