Showing posts with label projects. Show all posts

Weekend Project - Mini Cornhole

Somehow I completely escaped cornhole while in college. I must have seen people playing it, but probably thought it looked a bit too silly to play myself. One of my friends in grad-school had a set, however, and I gave it a try.

Turns out I'm really good at throwing a beanbag into a hole - and had a good deal of fun doing it.

So this weekend I set out to make a set of my own! I had some plywood lying about, so that set the dimensions of the boards to 20"x13" (which is pretty close to the golden ratio). I used two 7" sections of my favorite 2"x2" furring strip for the legs.

The recipe is simple enough: Slice off the sections with the jigsaw, then drill a hole big enough to get the jigsaw blade into and spiral out until you can cut out the center hole.


I measured out the center of the hole, and then used an old lid (a paint can could work as well) to mark a circle. You can center the circle by making tic marks the radius away in the horizontal and vertical directions. Line up the edges of the circle with those marks, and it should be centered.

I drilled a hole large enough for the jigsaw blade and then spiraled out to cut the hole out. Be careful and take your time during this part, since it's largely freehand, it's also VERY dangerous!


Sand everything down so there are no edges to get splinters from. That would put a damper on your fun!

Onto painting! The photos are a bit out of order - I hadn't charged my drill - and I got a head start on painting before finish the cuts. There are some tricks that can make the painting go easier. I was going for a three-tone design, with two lines leading up to the hole. First I laid down a strip of painters tape for where I wanted the line to go, and painted around it.


Running a razor blade (or x-acto knife) along the edge of the tape helps it peel up without dragging the paint up with it.


I also used the x-acto knife and the lid I drew the circle with to cut a nice circle out of the ring of tape around the edge. This left a nice circle when I painted the highlight strips.


Finally, attach the legs with a couple of screws (this prevents them from rotating). Don't forget to counter-sink the screws, so you don't have the heads sticking up waiting to catch someone's finger.


You may have to do some touch-up work, but we're done with the boards. Now onto the bags.

I used some split-peas for filler, as they have a nice smooth feel to them (it must have looked pretty strange to see me feeling up all the beans in the store). I measured out ~5.3 oz as a good weight, which used 2 16oz bags of beans for the 6 bags. As you can see, I was very careful about measuring out the beans :p.


Finally, we used some old cloth we had lying around for the bags, which are sewn just like a pillow - inside out and the flipped, filled, and sealed.


All done! Grab a cold soda and enjoy your handi-work.


Tools:
  • Jigsaw
  • Hand drill
  • Sandpaper
  • Painter's tape (optional)
  • Paintbrush
  • Coutersink / drill bits / screwdriver bit
Supplies:
  • Plywood (spare, probably ~$10)
  • 2"x2" furring strip ($2)
  • Screws (8x ~$5 for a large pack)
  • Paint (I used some old latex paint we had lying about ~$5)
  • Cloth (spare, ~$2)
  • Beans ($4)
Total: ~$28


Weekend Project - Floor Lamp

I've wanted to make a Japanese-themed floor lamp to go in our reading nook for quite a while now, and finally got off of my rear to do it. I'll lead off with the beauty shot of it in place, because it really is quite nice.


I wasn't able to find 1"x1" wood anywhere (the actual dimensions are closer to 3/4" square), so I had to cut a 2"x1" in half the long way. I wanted a lamp that would be 4' tall, and around 8" wide. These measurements worked out perfectly, as with one 12' section of board, I was able to cut out 4, 4' lengths for the corners and 12, 7.5" lengths for the lattice.


After a quick stain, I hot-glued each of the four corners with the three of the connecting pieces, and then nailed them together. Two of the corners were then combined, so I had two components of one full side and one partial side.


The longest part of this project was trying to find some good paper. I could only find industrial size sheets of Japanese rice-paper, and eventually settled on tracing paper. The tracing paper worked out very well in the end. With the paper selected, I just hot-glued it to each of the two complete sides.


Next up, the sides were joined together with a cross bar formed from a dowel running through the center. This will allow us to hang the bulb for the lamp.


With that done, the next two sides were covered with paper (the final side is quite difficult once the other three are covered). And you can see that it lights up nicely.


Back to the saw and staining to cut some trim for the base.


With that glued together, the final segments of the paper go in, and we're done.


Here's a cool looking view from the top.


That covers the structure of the lamp. Just as important is the electrical component. This isn't too difficult; it comprises of an electrical cord, a switch, and a socket. I thought I would try something different here, and made a video of the wiring process. Remember to use all safety precautions.


This project was fairly easy and straightforward. Having done it there are a few things I would have done differently, however. Mainly, I would have used a few more cross supports. This would have meant that the windows would have been smaller, which would have made it much easier to find paper to fit (I could have gone with the next size down, rather than the largest tracing paper size). If you look closely, you can also see that for the lowest window, the paper is glued to the base. Again, if there were more cross beams, I could have placed one at the base as well. All in all, you can't tell unless you know what to look for (so perhaps I shouldn't have told you ;) ), and I'm very pleased with the glow it gives the reading nook.

Here's the breakdown:
Costs:
  • $19 - Wood
  • $5 - Stain (I ran out of the old stuff)
  • $8 - Electrical bits & pieces
  • $13 - Paper
  • Total: $45
Tools:
  • Jigsaw
  • Random Orbit Sander (only because I had to slice the wood in the beginning, you could do it all with pre-sanded trim)
  • Miterbox & handsaw
  • Nailgun (I wish, this would have made it so much easier to do the frame)

Weekend project: Bluetooth Radio

Perhaps you may have seen these bluetooth powered speakers popping up around. Well, I had an old bluetooth headset that was sitting in my 'junk electronics' drawer, and I thought it would be fun to turn it into the receiving end of a bluetooth speaker system for the house. You may need an app such as btmono to play music to a mono (as opposed to stereo) headset.

The parts we'll need. Headset, audio jack, and splitter.

After trying to remove the case for an hour,
it was simpler to dremel off the speaker section
and get at the wires that way.

Testing it out with the audio jack.

Finally, I've hot-glued everything in. I would recommend
hot-gluing over the exposed leads so you don't get
speaker pop when plugging in the speakers.

Weekend Project - Photopopper

One of the current geek things to do is see what you can fit in an altoids tin. One of my friends had a similar tin that I was playing with awhile ago. He saw me playing around with it and challenged me to come up with something.

Well I've failed. It doesn't fit in the tin.

But it was still great fun to work on! And it's the perfect weekend project.
So what am I talking about? It's Solarbotics BEAM photopopper photovore. That's a mouthful, so let's break it down; it's a robot that follows the light. I got the design from the Solarbotics page, where you can buy a kit from them, although I just purchased the components on my own, as I wanted to fit them in the tin. 

Here's the picto-breakdown - scroll all the way to the bottom for a video!

It's best to build the circuit on a prototyping board to
make sure everything works. If not, it's easy to fix here.

Once it's working, you can solider it together.

Finally, we use some double-sided tape to attach the shell.


The tabasco robot! It's hard shell protects
it from many natural predators.

Weekend Project - Wine Bottle Torches

We had seen these blue wine bottles turned tiki-torches in various corners of the internet, and decided that they would look great on our back porch (and might even keep the bugs away too). So a quick trip to the hardware store netted the required components for a hair under $25 (nearly half was in the $10 torch fuel). The hardest part of the construction was in removing the wine bottle labels - but repeated soaking in warm, soapy water and scrubbing with rubbing alcohol removed them to our satisfaction. Here are the photos of them in use (we have one hanging up and one on the table);
Tools:
  • Screwdriver
  • Teflon tape
  • Lighter
Cost:
  •  $25 (fuel, hardware, teflon tape - no wine bottles)


Backyard Table

    We've been on a scrap-wood kick - trying to get rid of the extra plywood we have with some useful projects. One of these is a table for the backyard patio. The fountain turned our backyard into a nice oasis to chill out in, but it was still lacking something. Primarily a table, so that our back-porch picnics would have somewhere to put the food instead of just on our laps.
    In our characteristic fashions, the Mr. wanted to just screw some plywood together, stain and seal it, and then call it a day. But the Mrs. had some more vibrant ideas, and after a quick trip to the local hardware store, we came back with some tile and mastic. Here's the story of the backyard table.

    We cut out an (almost) equilateral triangle from one of the plywood scraps, rounded the corners, and sanded it to a nice finish. After this came two coats of stain and sealer.
     Next we laid the tile out on the wood, marked the edges, and cut the tile with a Dremel equipped with a diamond cutting wheel (sorry no picture). This process took awhile, and should also be completed with proper safety precautions (safety goggles, dust-mask, and gloves).


    Next up was the mastic and grout - a thin layer of mastic was applied on the surface of the wood, and we pressed the tiles into that. Once it had dried (24 hrs) we applied the grout to the tiles. We needed to start at the center tiles and work our way to the edges to allow the edge tiles some time to set. This way we didn't knock all the grout off when cleaning the tile surfaces. Moistening the cloth helped remove the drier grout from the top of the edge tiles.

    After that the legs were attached with some hardware that we had laying around from when we built the bench. The screws going into the table-top are 1/4 inch plywood screws. With the metal bracket, they barely avoid going through the plywood.


    With a couple of coats of grout sealer, we had a final product! The table nestles nicely between the two chairs when we have them angled towards the fountain, and is matched in height to the arms, so it's easy to use.

Tools:
  • Mitre saw
  • Jig saw
  • Power screwdriver ./ drill
  • Dremel
  • Protective devices (goggles, dust mask, gloves)
Cost:
  • $10 Tile
  • $5 Mastic
  • $0 Existing wood, screws.

Wine Bottle Cutting Jig

    We've been storing up empty wine bottles for awhile. The plan was to recycle them into some artwork - vases, candleholders, etc. Earlier this year, we tried to cut the top off by scoring them with a glass cutter and heat-shocking the glass. The plan didn't work out so well, mainly because the scoring was very uneven, both in pressure and in making an even line around the vase. So while we were able to heat-shock the glass into breaking off, the end result was more effort than it was worth, and not very pretty.
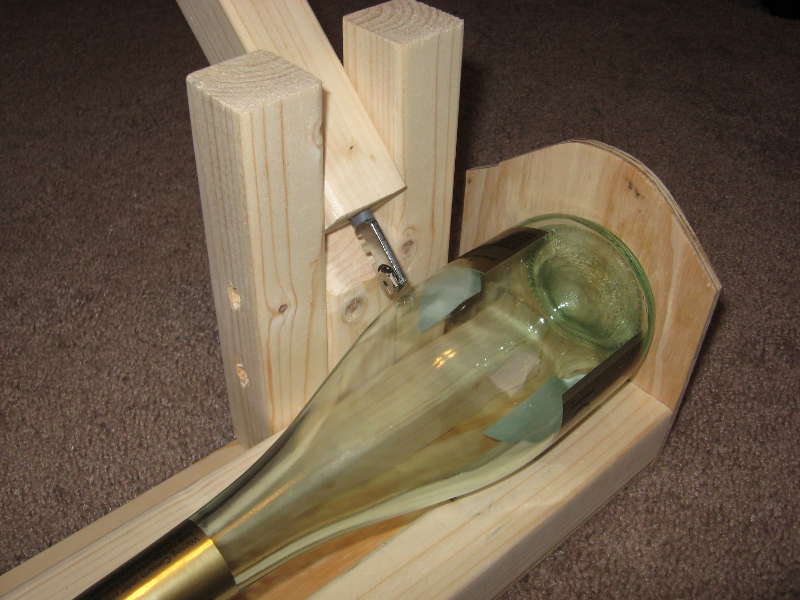
    So over the last few months, I've ideas of how to improve the results simmering on my mind. The result is a nifty cutting jig I threw together this weekend:


The idea is simple: a couple of boards to hold the bottle while we rotate it, and a backstop to keep the bottle from sliding back and forth. The glass-scoring tool is seated in a wood block so it's easier to apply pressure.

My favorite part is the peg and hole system I used to allow the tool to cut the bottles at varying heights. The holder / guide for the cutting tool has two pegs at the bottom which pair up with numerous holes along the length of the guide-rail.
This allows the jig to accommodate bottles of multiple sizes. It doesn't allow for arbitrary distance movements, but the steps are 3/4" apart, so it's close enough for practical purposes.
As you can see, it makes nice even scoring - perfect for later heat-shocking for cutting the glass.

Tools needed:

  • Jigsaw
  • Mitre Saw
  • Sander
  • Power screwdriver / drill

Total cost:

  • $7 (Another furring strip and some longer screws.)

EDIT: Here's a schematic of the jig with sizes. The base and backing is 1/4 inch plywood, and the square wood pieces are furring strips. Be sure to take all safety precautions when working with wood, glass, and fire. Click for a larger size.

Bedside Tables - Part IV - Done!


  We've finally finished the bedside tables! Here's a quick overview of the final steps, and a few pictures of the final product.
  Left out is the cutting of the side panels and the doors. The side panels needed to fit flush, which was achieved by setting the jigsaw at a 45-degree angle for the long cuts along the side (See the picture below). I switched back to a straight cut for curve at the bottom and top of the side panels. The doors also needed straight cuts in for the hinges. After the sanding, staining, and sealing, we had the side panels and doors finished.


   Once everything was stained, the doors needed to go on first, as I needed access to get to the hinges. I used quite a few washers to keep the screws from piercing through the thin 1/4 inch plywood.

  We picked up a magnetic latch to keep the doors shut, and again used three or four washers on the door catch. Positioning the door catch required some dexterity; almost closing the door, then marking the horizontal and vertical position of the catch. The latch also required some distance tweaking so it was close enough to the edge to grab the door, but not far enough over to keep the door open, or be too obvious.


Here's the final product. The notches in each door, combined with the angled cut, allow them to open almost all the way. The sides are nailed into the shelves with small furniture nails. We're letting them air out in the study for a few days to loose the smell before we bring them upstairs, but other than that, they're finally done!


Here's the price tear down:
Tools:
  • Jigsaw
  • Mitre Saw
  • Power drill / screwdriver
  • Sander
Supplies:
  • Wood, stain, etc. was left over from the bench.
  • Hardware (angle brackets, hinges, door handles, washers): $30
Total:
  • $30

Home Server - Part IV - Networked Printing

  Okay, so the Unison file sync is taking longer than I expected, but I realized that I could network the printer, so as to have any computer in the house print through the wireless. There were a few hiccups, but it was mostly painless. Here's what I had to do.

Part I - Installing Linux
Part II - Setting up SSH
Part III - Setting up SVN
Part IV - Networked Printing

  First you'll want to install the samba print driver in Ubuntu, instead of using the command line to install this time, I went to the software center, searched for samba, and installed from there. I followed the steps from this Ubuntu community link, but had to make some modifications as I went. It was fairly fast, and I had to modify most every step, so here goes. First off all the setup is Ubuntu server with attached printer (HP Officejet 5500), two Windows 7 boxes, and a Win XP laptop that needed to print to the printer.

  I went to http://localhost:631 from a browser on the Ubuntu box, but this didn't have much information on sharing the printer beyond allowing me to confirm the name. Next up was to open the samba configuration file "sudo vi /etc/samba/smb.conf". Under [printers] (there is something like #printers above it - don't be fooled, keep scrolling), change / add the lines to;
    browsable = yes
    guest ok = yes
    use client driver = yes

The last one is for the XP machine. Now restart samba with;
    sudo restart smbd
    sudo restart nmbd

  For the the Windows client printers, add the network printer by going to; Start -> Printers and Faxes -> Add a printer -> Network printer -> Now enter the local IP address of the machine and then the exact printer name for instance "\\192.168.1.21\officejet-5500-series". It will then give you a warning about installing drivers from the network, but then it will fail to install the driver. Select one close to you model (if you can find the exact model go for it).
  At this point, the Windows 7 machines were printing fine. However the Windows XP box was not. I had to go back into printers and faxes, then right click on the Network Printer -> Properties -> Advanced. If you were not able to select the exact driver when you set up the printer (as I was) this may help. Previously I had already used the printer from the XP machine, and it had correctly installed the driver then. I was able to pull down the menu next to driver and find the correct one. After clicking Apply, Windows prompted me to install the driver again, but (again) they didn't have it, so I canceled out of that dialog, and hit OK to the printer's properties. With the correct driver associated, the printer was printing! As always questions and comments are welcome!

Weekend Project - Hat Rack

  Here's another quick weekend project we undertook. After having our hats laying around on chairs and coffee tables, I finally decided that it was time to give them a dedicated place. So we brainstormed some ideas, and thought it would be a neat idea to have a "his and hers" hat rack, or even better, a "Mr. and Mrs." hat rack.
  We picked up a pine sign plaque from a hobby store, and then some hooks from the local hardware store. After some quick staining, sealing, and screwing in the hardware (I opted for slightly smaller than the stock screws so they wouldn't go through the other side), the sign was ready for some customization.
Cutting out the stencil
  In an attempt to make nice clean text, I set down a layer of tape and then a print out of a nice font with above it. Tracing over the font with moderate pressure using an exact o-knife cut through the paper and the tape. As a tip, i would recommend not layering the tape on itself, this gave me some trouble later.

Trace the stencil with the knife again for easy removal


 After tracing with the knife and removing the stencil and tape, it was ready for a layer of paint. This is just a craft-acrylic paint laid down over the tape stencil.
Careful scraping can remove the stray paint.


  When removing the tape, I found it very useful to trace around the stencil with the exact o-knife again. This separated the paint on the wood from the paint on the tape. Hence, the tape was much less likely to peel up any paint with it (the 's' above suffered while I figured this out - but I'll just say it's an antique look).
The finished product!
It's practical too!
Here's the final product with all the tape removed and looking snazzy up on the wall. A couple of 1/4 inch drill holes in the back provide a recess for the nails. Just be careful not to go all the way through the board.


This was a pretty quick, cheap, and unique project that really adds some nice personality to the entrance by the door. Now for the usual breakdown:

Tools:
  • Sandpaper, stain, sealant, acrylic paint.
  • Screwdriver / drill
Price:
  • Tools: Used our existing stock.
  • Supplies: $8 (sign) $10 (hardware)
  • Total: $18