Showing posts with label furniture. Show all posts

The Coffee Table

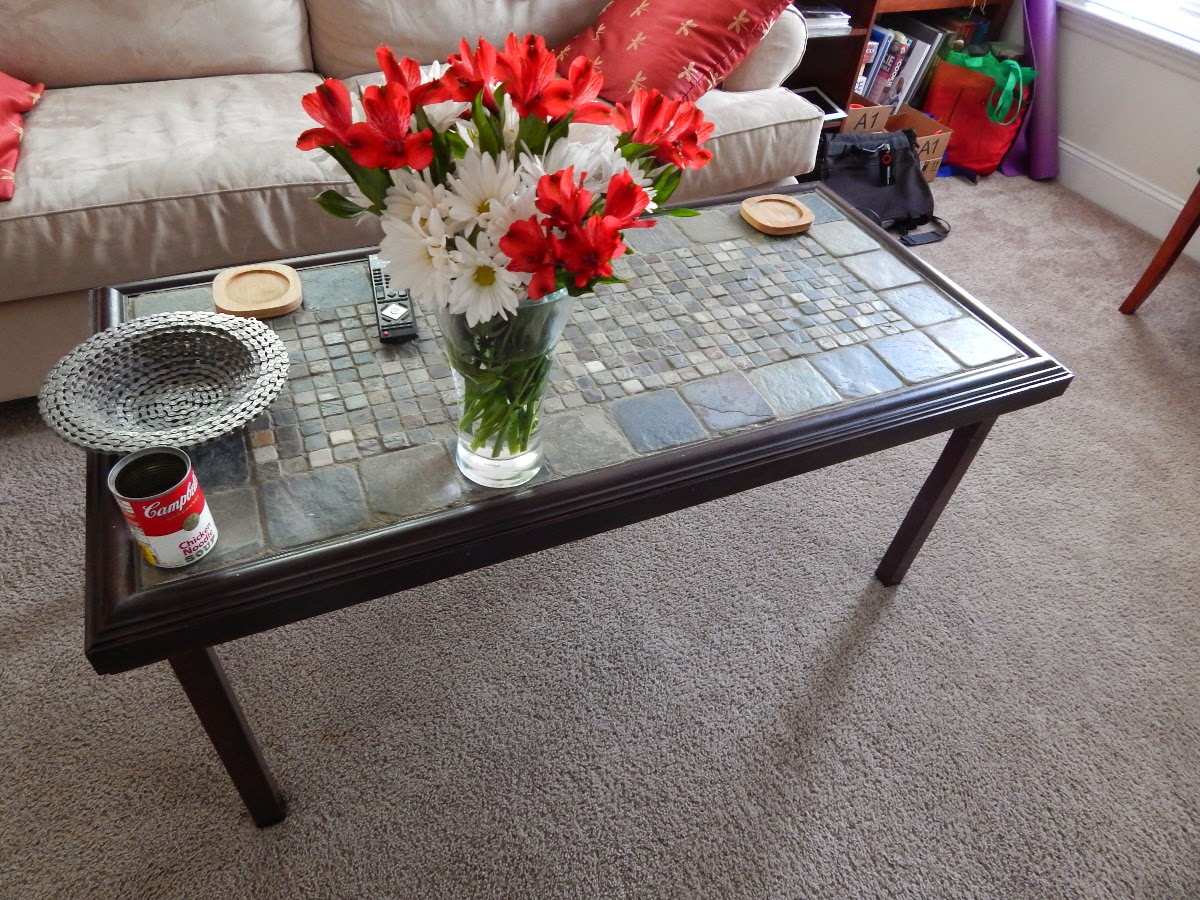
From the archives: Here's one of our first projects, a coffee table. The apartment had this incredible empty space between the couch and the TV, plus there were absolutely no flat surfaces on which to rest anything. While I was going to go for the eminently practical plywood on my favorite 2x2 furring strips, the better half convinced me to make it a bit more artistic. Together we browsed through the hardware store and found these fantastic tiles. After about a month of hard work, we ended up with this table:


As far as construction goes, there's a plywood surface, under which there is an open frame of furring strips, with the four legs going into the corners and reinforced / held into place with an angled strip:


On the top, we boxed in the center with some trim, then smeared out the tile adhesive, placed the tiles down and added all the grout. Unfortunately one tub of grout didn't quite cover it, and we had to go back for another tub.


Also, the tiny tiles are horrible to grout, they take forever. We also went ahead and sealed the grout to help protect the surface. The final product was well worth all the effort. We think it's a fantastic table and one we'll certainly have for awhile.

Tools:
  • Miter box and saw
  • Screwdriver / drill
Cost:
  • Tools: $20
  • Supplies: $150
  • Total: $170

Weekend Project - Floor Lamp

I've wanted to make a Japanese-themed floor lamp to go in our reading nook for quite a while now, and finally got off of my rear to do it. I'll lead off with the beauty shot of it in place, because it really is quite nice.


I wasn't able to find 1"x1" wood anywhere (the actual dimensions are closer to 3/4" square), so I had to cut a 2"x1" in half the long way. I wanted a lamp that would be 4' tall, and around 8" wide. These measurements worked out perfectly, as with one 12' section of board, I was able to cut out 4, 4' lengths for the corners and 12, 7.5" lengths for the lattice.


After a quick stain, I hot-glued each of the four corners with the three of the connecting pieces, and then nailed them together. Two of the corners were then combined, so I had two components of one full side and one partial side.


The longest part of this project was trying to find some good paper. I could only find industrial size sheets of Japanese rice-paper, and eventually settled on tracing paper. The tracing paper worked out very well in the end. With the paper selected, I just hot-glued it to each of the two complete sides.


Next up, the sides were joined together with a cross bar formed from a dowel running through the center. This will allow us to hang the bulb for the lamp.


With that done, the next two sides were covered with paper (the final side is quite difficult once the other three are covered). And you can see that it lights up nicely.


Back to the saw and staining to cut some trim for the base.


With that glued together, the final segments of the paper go in, and we're done.


Here's a cool looking view from the top.


That covers the structure of the lamp. Just as important is the electrical component. This isn't too difficult; it comprises of an electrical cord, a switch, and a socket. I thought I would try something different here, and made a video of the wiring process. Remember to use all safety precautions.


This project was fairly easy and straightforward. Having done it there are a few things I would have done differently, however. Mainly, I would have used a few more cross supports. This would have meant that the windows would have been smaller, which would have made it much easier to find paper to fit (I could have gone with the next size down, rather than the largest tracing paper size). If you look closely, you can also see that for the lowest window, the paper is glued to the base. Again, if there were more cross beams, I could have placed one at the base as well. All in all, you can't tell unless you know what to look for (so perhaps I shouldn't have told you ;) ), and I'm very pleased with the glow it gives the reading nook.

Here's the breakdown:
Costs:
  • $19 - Wood
  • $5 - Stain (I ran out of the old stuff)
  • $8 - Electrical bits & pieces
  • $13 - Paper
  • Total: $45
Tools:
  • Jigsaw
  • Random Orbit Sander (only because I had to slice the wood in the beginning, you could do it all with pre-sanded trim)
  • Miterbox & handsaw
  • Nailgun (I wish, this would have made it so much easier to do the frame)

'Origami' Bookshelf

If you haven't seen Frank Lloyd Wright's Origami chair, you should. Legend says each chair comes from a single sheet of 8x10' plywood cut and remade into a chair. Needless to say I wanted one as soon as I saw one. Unfortunately they're not for sale :(

So I did what I could. Inspired from the chair I decided to start a bit smaller with my own 'origami bookshelf' from some leftover wood.

We'll start by slicing the old piece of leftover wood in half. One half goes to the shelves and the other to the legs. Then we'll cut slots halfway through so they can slot into each other. There are some small adjustments I had to make as I went on, but I'll let the pictures speak for me.

The leftover wood piece.
Marking up the slots.
After the cuts.

Checking that everything fits.

The pieces individually.

Assembled lying down.

Assembled standing up. There is a bit of a tilt to the setup, 
resulting in a leg being trimmed towards the end.
Also I thought that the second shelf angled with respect to
the first and to the ground.

Prepping for the stain.

Turns out stain can polymerize if
left exposed to air and alone.


Done with staining, you may have noticed an extra piece.
The extra piece helps maintain the shelf separation.

Backyard Table

    We've been on a scrap-wood kick - trying to get rid of the extra plywood we have with some useful projects. One of these is a table for the backyard patio. The fountain turned our backyard into a nice oasis to chill out in, but it was still lacking something. Primarily a table, so that our back-porch picnics would have somewhere to put the food instead of just on our laps.
    In our characteristic fashions, the Mr. wanted to just screw some plywood together, stain and seal it, and then call it a day. But the Mrs. had some more vibrant ideas, and after a quick trip to the local hardware store, we came back with some tile and mastic. Here's the story of the backyard table.

    We cut out an (almost) equilateral triangle from one of the plywood scraps, rounded the corners, and sanded it to a nice finish. After this came two coats of stain and sealer.
     Next we laid the tile out on the wood, marked the edges, and cut the tile with a Dremel equipped with a diamond cutting wheel (sorry no picture). This process took awhile, and should also be completed with proper safety precautions (safety goggles, dust-mask, and gloves).


    Next up was the mastic and grout - a thin layer of mastic was applied on the surface of the wood, and we pressed the tiles into that. Once it had dried (24 hrs) we applied the grout to the tiles. We needed to start at the center tiles and work our way to the edges to allow the edge tiles some time to set. This way we didn't knock all the grout off when cleaning the tile surfaces. Moistening the cloth helped remove the drier grout from the top of the edge tiles.

    After that the legs were attached with some hardware that we had laying around from when we built the bench. The screws going into the table-top are 1/4 inch plywood screws. With the metal bracket, they barely avoid going through the plywood.


    With a couple of coats of grout sealer, we had a final product! The table nestles nicely between the two chairs when we have them angled towards the fountain, and is matched in height to the arms, so it's easy to use.

Tools:
  • Mitre saw
  • Jig saw
  • Power screwdriver ./ drill
  • Dremel
  • Protective devices (goggles, dust mask, gloves)
Cost:
  • $10 Tile
  • $5 Mastic
  • $0 Existing wood, screws.

The Bench

Here's a project that we completed awhile ago, but haven't posted yet. It's the second major construction project we built - a bench. You see when we moved into our new apartment, there was this recessed nook in the upstairs bedroom that was just calling for a cushioned seat for some comfy reading. Over the course of about six months (we really got slowed down on the sanding) we finally built the bench. Here's the story:

 The basic supplies for this project were a bunch of 2x2 furring strips (which can be had for a few dollars / 8 feet, so they tend to be one of my favorite basic building supplies), plywood for the walls and surfaces, and metal brackets to hold everything together. Of primary concern was that the center of the bench not sag and support the seat fully. To this end, I created two frames (see right) of the furring strips.

 On top of each frame went a piece of plywood. You can see one of the few tools I was using, my hand drill / screwdriver. This is really a must-have, switching to the drill and putting in a few pilot holes helps the screws go in straight and without causing the surrounding wood to splinter. Also, it really helps to have a countersink (a cone shaped bit) that drills out a divot for the screw's head to recess into. This way the top of the wood is flat, and there are no screws sticking up to poke yourself on (or in this case to interfere with the seat top and baskets).

 Here you can see the walls going up. Again, the furring strips provide support (they will be the main weight-bearing elements). Imagine the bench for a moment without the plywood and with a top on it. If you're like me you can see the whole lot shearing and falling over to one side when someone sits on it. By having the plywood "L" into the furring strips at the end, I was hoping to use the plywood's resistance to shearing to help strengthen the bench to this particular mode of failure.

  Here we are with the top on. One thing you can notice, is that because the plywood L's into the furring strips there is a small gap. If you have a router, you could create a small groove in the furring strip for the plywood. This would remove the gap while maintaining structural stability.
  Our joke at this point was that it looked more like a coffin than a bench, and unfortunately it stayed this way for a couple of months over the course of the winter as we were building up the courage to sand it down prior to the staining.

  Here's the complete creation. What is left out of these pictures are the steps of staining and the creation of the cushion for the top. Prior to staining, we also attached two pieces of trim on the front to add embellishment, but really to just help hide the exposed sides of the plywood.
  The cushion was a really good find. After looking for foam at a bunch of craft stores and finding it very high priced (it was looking like $75-80 for 2 inches of foam) we found a camping mat at our local wholesaler (COSTCO / Sam's / etc.) with three inches of foam for $30. Just had to slice it up, wrap the cloth over it and staple the cloth to a thin (1/4 inch) piece of plywood. This was screwed in from under the seat to hold it in place.
  We snagged a few baskets and pillows from one of those store that sells unsold / slightly damaged shopping center stuff (Home Goods, etc.), and the bench was complete!
Here are a couple of other photos of the complete bench in the "reading nook".

Tool List:
  • Wood saw and miter box (cutting the furring strips).
  • Cordless screwdriver (also used to drill the pilot holes)
  • Jigsaw (This was the next tool on the purchase list, although all of the plywood pieces could have been cut by the hardware store).
Price Tag:
  • Tools: $63
  • Supplies (wood, stain, baskets, foam, etc.): $166
  • Total: $229

Bedside Tables - Part IV - Done!


  We've finally finished the bedside tables! Here's a quick overview of the final steps, and a few pictures of the final product.
  Left out is the cutting of the side panels and the doors. The side panels needed to fit flush, which was achieved by setting the jigsaw at a 45-degree angle for the long cuts along the side (See the picture below). I switched back to a straight cut for curve at the bottom and top of the side panels. The doors also needed straight cuts in for the hinges. After the sanding, staining, and sealing, we had the side panels and doors finished.


   Once everything was stained, the doors needed to go on first, as I needed access to get to the hinges. I used quite a few washers to keep the screws from piercing through the thin 1/4 inch plywood.

  We picked up a magnetic latch to keep the doors shut, and again used three or four washers on the door catch. Positioning the door catch required some dexterity; almost closing the door, then marking the horizontal and vertical position of the catch. The latch also required some distance tweaking so it was close enough to the edge to grab the door, but not far enough over to keep the door open, or be too obvious.


Here's the final product. The notches in each door, combined with the angled cut, allow them to open almost all the way. The sides are nailed into the shelves with small furniture nails. We're letting them air out in the study for a few days to loose the smell before we bring them upstairs, but other than that, they're finally done!


Here's the price tear down:
Tools:
  • Jigsaw
  • Mitre Saw
  • Power drill / screwdriver
  • Sander
Supplies:
  • Wood, stain, etc. was left over from the bench.
  • Hardware (angle brackets, hinges, door handles, washers): $30
Total:
  • $30

Weekend Project - Hat Rack

  Here's another quick weekend project we undertook. After having our hats laying around on chairs and coffee tables, I finally decided that it was time to give them a dedicated place. So we brainstormed some ideas, and thought it would be a neat idea to have a "his and hers" hat rack, or even better, a "Mr. and Mrs." hat rack.
  We picked up a pine sign plaque from a hobby store, and then some hooks from the local hardware store. After some quick staining, sealing, and screwing in the hardware (I opted for slightly smaller than the stock screws so they wouldn't go through the other side), the sign was ready for some customization.
Cutting out the stencil
  In an attempt to make nice clean text, I set down a layer of tape and then a print out of a nice font with above it. Tracing over the font with moderate pressure using an exact o-knife cut through the paper and the tape. As a tip, i would recommend not layering the tape on itself, this gave me some trouble later.

Trace the stencil with the knife again for easy removal


 After tracing with the knife and removing the stencil and tape, it was ready for a layer of paint. This is just a craft-acrylic paint laid down over the tape stencil.
Careful scraping can remove the stray paint.


  When removing the tape, I found it very useful to trace around the stencil with the exact o-knife again. This separated the paint on the wood from the paint on the tape. Hence, the tape was much less likely to peel up any paint with it (the 's' above suffered while I figured this out - but I'll just say it's an antique look).
The finished product!
It's practical too!
Here's the final product with all the tape removed and looking snazzy up on the wall. A couple of 1/4 inch drill holes in the back provide a recess for the nails. Just be careful not to go all the way through the board.


This was a pretty quick, cheap, and unique project that really adds some nice personality to the entrance by the door. Now for the usual breakdown:

Tools:
  • Sandpaper, stain, sealant, acrylic paint.
  • Screwdriver / drill
Price:
  • Tools: Used our existing stock.
  • Supplies: $8 (sign) $10 (hardware)
  • Total: $18