Showing posts with label nook. Show all posts

Weekend (tech) Project: Building CM11

I finally decided to dive into the deep end and compile Android from source!

This is not a complete how-to post. I'm writing this first to help you troubleshoot your own build and show where you might run into trouble. Primarily, though it's my notes for the next time I build.


Building:


First off, I'm building this in Ubuntu. Also, this is going to use some hard disk space. Make sure that at least 37 (more safely 40) GB is available. I didn't have quite this much available on my linux partition, so I plugged in my external HDD. You have to make sure that you have read-write-execute permissions to the mounted drive. The easiest way I found to do this is to use;
  • sudo umount /media/madscientist/MyExternalHDDsudo mount -t ntfs-3g /dev/sd** /media/madscientist
You need to fill in the **. This can be found be finding where the device is located in /dev. You can do this with the command;
  • sudo fdisk -l
From here on out, I'm following the instructions at;
http://wiki.cyanogenmod.org/w/Build_for_encore
with backup from this thread;
http://forum.xda-developers.com/showthread.php?t=1370873

Before you run envsetup and breakfast, you need to add a file, here's the description:
Have you set up your local manifest file to use the NookieDevs repo? If not, here is one that will work. This goes in the file [source directory]/.repo/local_manifests/roomservice.xml
<?xml version="1.0" encoding="UTF-8"?>
<manifest>
<project name="NookieDevs/android_device_bn_encore" path="device/bn/encore" remote="github" revision="cm-11.0" />
<project name="CyanogenMod/android_kernel_bn_encore" path="kernel/bn/encore" remote="github" revision="encore-omap3-3.0.y" />
</manifest>
After this, you may need to re-run repo sync.

Okay, now my nook isn’t showing up on usb. Trying to find adb_usb.ini to edit as per;
http://wiki.cyanogenmod.org/w/Doc:_adb_intro#.22Device_not_found.22_errors
Finally, I found the file in; ~/.android/adb_usb.ini and could add the code: 0x2080

With this done, I restarted the adb server (adb kill-server, adb start-server).
You'll have to answer a dialog on the nook to confirm that the computer is allowed to run usb debugging. With this done I was able to attach to the debugger.
(Another useful site for nook usb info is here; http://nookdevs.com/NookColor_USB_ADB)

This allowed me to run;
  • ~/Build/android/system/device/bn/encore$ ./extract-files.sh
Which requires that you already have cm 10.2 or later installed on the nook. This pulls some hardware information from the nook for building.

Then you can run the build as normal. From here on out I didn't have a problem building.

Installing:


Before you install, you ABSOLUTELY MUST back up your existing ROM. This makes it so very much easier to get back to a working state if something goes wrong. Like having an out-of-date recovery image....


When installing the build I encountered a “Build failed status 7” as per this thread
http://forum.xda-developers.com/showpost.php?p=47672324&postcount=353

This was because the recovery image was out of date. To install the latest recovery image, I followed the directions from http://nookdevs.com/CWR_Manual_Installation in which you’ll need to mount and copy some files over via adb. Here's the dump of my command line history:
  • adb shell mount -o rw,remount /
  • adb shell mkdir /boot
  • adb shell mount /dev/block/mmcblk0p1 /boot
  • adb shell mv /boot/uRecImg /boot/uRecImg.stock
  • adb shell mv /boot/uRecRam /boot/uRecRam.stock
  • adb push /buildpath/android/system/out/target/product/encore/kernel /boot/uRecImg
  • adb push /buildpath/android/system/out/target/product/encore/ramdisk-recovery.ub /boot/uRecRam
This brought me to CWM-based recovery v6.0.4.6, which looks promising as google seems to associate this with CM11.

This worked - CM11 was up and running!

Grab the latest gapps from CM’s website (http://wiki.cyanogenmod.org/w/Google_Apps) and you're done!


Weekend Project: Tablet Stand

I added a new tablet to the family, and thought that it was about time I came up with a stand so I could use them while typing. So with a bit of scrap wood and a few quick cuts I was able to whip one up in no time. It works great for both the Galaxy Note 10.1 and for the Nook Color. The stand is only about 4.5 in long and very lightweight. Here's the story;

Here's the basic design. A few slivers of plywood held
together with glue and dowels.

The side-view. You can see the design sketches below.

Making sure that it will fit the tablet.

A layer of spray-paint goes a long way

You can see it holds the Note 10.1 nicely.

It also works great for the nook!

Here's the side view, and you can see that it holds
the nook comfortably in landscape and in portrait mode.

The Galaxy Note 10.1 barely fits is portrait mode too.

Rooted Nook - Borrowing e-books

  I'm always looking for another trick to teach my rooted Nook Color e-reader, so when I found out I could 'borrow' library books to read, I just had to give it a try. I'll be using my local library, the Durham County Library, which uses OverDrive and Adobe Digital Editions to provide it's e-book lending. Your library may also use OverDrive (they seem to be pretty popular), and if they do this guide should work for you as well. If not, the best resource for you to go to would be the library itself, take your e-reader and they likely have someone on staff who can teach you how to set it up.
  I found our library has a great online reference that you may want to have a look at; the DCL's e-book basics guide. This guide is an in-depth look at that guide with some hiccups I encountered along the way. You should already be set up with a physical library card and a PIN that you set when you made the card (four digits - try the last 4 from your phone number if you don't remember).

  You can do this one of two ways, first I'll cover using Adobe to transfer the file to the Nook and then using the Nook reader app to view it. You should be able to use this method with any version of the Nook - either the original, touch, Color, Tablet, or rooted Color, like me. You'll need Adobe Digital Editions (download from the link above) and an account with Adobe. Here's where I ran into my first problem - I had to go through the process of making an account three times until it finally sent out the confirmation e-mail to my account. If you'd like to see a larger version of one of the images below, just click on them.

  From the library eBook page click on the OverDrive link and start browsing for books. I'll be downloading Fool Moon (#2 of the Dresden files).
  You can select either 7 or 14 days as a checkout period (top highlight - didn't see that the first time through), and then proceed to checkout. At checkout you'll need your library number (on the back of the card or key-ring dongle), and your PIN.
 Once you've checked out, you can "download the book" to your computer. Here's another catch - you don't actually download the book, you download a file that Adobe Digital Editions reads and uses to download the book from their server. Make sure you know where the file downloads too (check the \My Documents\Downloads\ folder).
   To get the book to appear in Adobe, just drag that file you downloaded onto the Adobe Digital Editions icon, it will download the book and you can now view it on your computer. But wait! You say, I wanted to view it on my Nook. Well I do to, so hold on.
  Grab your nook and use the USB cable to plug it in, then turn on file transfer. If you're like me and are rooted using CM 7 (grab the latest stable or more recent nightly - I'm running n253 at the time of this writing) pull up the status bar (1) and enable file transfer (2). I'm not sure how it looks if you're running the stock OS.

  Adobe Digital Editions should now recognize the device and suggest that you authorize it. It will notice both the "MyNOOKcolor" (which is the emmc or internal memory) and your SD card (mine is called NOOKSD, creative, I know ). You want to authorize the drive where you installed the Nook app (you can authorize both if you want to), then drag and drop the title to that drive.


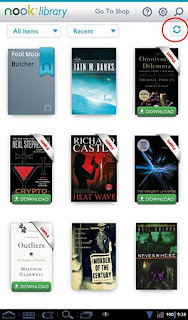
  Turn off file sharing on the Nook and disconnect it, then launch the Nook app. Once you hit refresh in the corner, you should see the library e-book appear. You're all done, enjoy the read!

  When you're done, launch Adobe Digital editions again, and from the library view (where you see the pictures of the covers), click the arrow in the upper left corner, this will bring up an options menu for the book. This will have the opportunity to return the book early if you wish. Otherwise, it will expire after the lending period is over and remove itself from you library.


  What do you do if you don't have a computer or USB access? There's still a way to get the book onto your nook, we'll go through OverDrive directly. First grab the OverDrive app from the market (I'm not seeing it in the B&N market, as of this writing keep trying perhaps they'll have it in the future). The above directions should still work for stock users though.

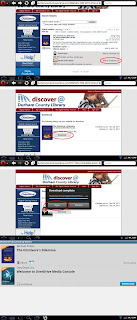
  Once you're in Overdrive (leftmost image) click menu, and then "Get Books". This will bring you to the add a library page if you haven't been here before, go ahead and click the add library, and enter the zip code on the next screen.


   Once you have a library associated, clicking on it, will bring up the web browser and direct you over to the e-book search for your library (I'm using Opera mobile, yours may look different)
  Here I've searched for "The Omnivore's Dilemma", select Adobe ePub book and follow the same sequence of download it as you did before; choose the checkout period and enter your library number (on the back of your card, or key dongle), and your PIN. You'll download a file, but again, this isn't the eBook itself. Choose to open the file with OverDrive (if you're even given an option) and OverDrive will begin to download the eBook. When it's done it will appear in your OverDrive library and you can read away!
  The OverDrive reader looks pretty simple, but it has most of the features you're used to from the Nook reader. Simply tap on the menu key to bring up the main menu of options (font size, style, brightness, etc.). I was unable to find a way to get the Nook app to display the book. If you are able to please drop me a line in the comments, I would like to hear it.

   When you're done with the book, long-press it in the OverDrive app and then select delete. This will bring up a menu of options, from which you can return the book early. One nice thing is that you can see exactly how many days you have remaining from the main library screen, after which the book will be removed from the library.


  That's all there is to it, I hope you make use of your local library's eBook lending options. I know I'm really enjoying being able to check out a book any time of day without having to drive to the library!


  Epilogue; Those of you who know me, are probably quite aware of my enthusiasm for my rooted Nook Color. Are you surprised I haven't posted the rooting process here? Yeah, so am I. I may post my collected tricks at some point, but I would really recommend visiting the xda-developers forums - there is usually a post there to guide you through whatever trouble there is, and there are plenty on rooting and your options for doing it.