So the page up and page down keys on my laptop (see my review on the T430s) are next to the directional arrows. This was driving me insane, as I would accidentally hit them and then my view would jump to kingdom come. Thankfully you can remap keys in Linux, and I found autohotkey for Windows. Such a lifesaver. I remapped pgup/pgdn to home and end. That's when I discovered...
How did I not know about HOME and END until now!?!?!
These are fantastic keys, especially since I'm so used to vi/m in Linux, and jumping to the beginning / end of lines to do inserts. It is super-useful to have these keys in Windows. I absolutely love the keyboard layout with the remapping now.
Weekend Project - Mini Cornhole
Somehow I completely escaped cornhole while in college. I must have seen people playing it, but probably thought it looked a bit too silly to play myself. One of my friends in grad-school had a set, however, and I gave it a try.
Turns out I'm really good at throwing a beanbag into a hole - and had a good deal of fun doing it.
So this weekend I set out to make a set of my own! I had some plywood lying about, so that set the dimensions of the boards to 20"x13" (which is pretty close to the golden ratio). I used two 7" sections of my favorite 2"x2" furring strip for the legs.
The recipe is simple enough: Slice off the sections with the jigsaw, then drill a hole big enough to get the jigsaw blade into and spiral out until you can cut out the center hole.

I measured out the center of the hole, and then used an old lid (a paint can could work as well) to mark a circle. You can center the circle by making tic marks the radius away in the horizontal and vertical directions. Line up the edges of the circle with those marks, and it should be centered.
I drilled a hole large enough for the jigsaw blade and then spiraled out to cut the hole out. Be careful and take your time during this part, since it's largely freehand, it's also VERY dangerous!


Sand everything down so there are no edges to get splinters from. That would put a damper on your fun!
Onto painting! The photos are a bit out of order - I hadn't charged my drill - and I got a head start on painting before finish the cuts. There are some tricks that can make the painting go easier. I was going for a three-tone design, with two lines leading up to the hole. First I laid down a strip of painters tape for where I wanted the line to go, and painted around it.

Running a razor blade (or x-acto knife) along the edge of the tape helps it peel up without dragging the paint up with it.

I also used the x-acto knife and the lid I drew the circle with to cut a nice circle out of the ring of tape around the edge. This left a nice circle when I painted the highlight strips.

Finally, attach the legs with a couple of screws (this prevents them from rotating). Don't forget to counter-sink the screws, so you don't have the heads sticking up waiting to catch someone's finger.

You may have to do some touch-up work, but we're done with the boards. Now onto the bags.
I used some split-peas for filler, as they have a nice smooth feel to them (it must have looked pretty strange to see me feeling up all the beans in the store). I measured out ~5.3 oz as a good weight, which used 2 16oz bags of beans for the 6 bags. As you can see, I was very careful about measuring out the beans :p.

Finally, we used some old cloth we had lying around for the bags, which are sewn just like a pillow - inside out and the flipped, filled, and sealed.

All done! Grab a cold soda and enjoy your handi-work.

Tools:
Turns out I'm really good at throwing a beanbag into a hole - and had a good deal of fun doing it.
So this weekend I set out to make a set of my own! I had some plywood lying about, so that set the dimensions of the boards to 20"x13" (which is pretty close to the golden ratio). I used two 7" sections of my favorite 2"x2" furring strip for the legs.
The recipe is simple enough: Slice off the sections with the jigsaw, then drill a hole big enough to get the jigsaw blade into and spiral out until you can cut out the center hole.
I measured out the center of the hole, and then used an old lid (a paint can could work as well) to mark a circle. You can center the circle by making tic marks the radius away in the horizontal and vertical directions. Line up the edges of the circle with those marks, and it should be centered.
I drilled a hole large enough for the jigsaw blade and then spiraled out to cut the hole out. Be careful and take your time during this part, since it's largely freehand, it's also VERY dangerous!
Sand everything down so there are no edges to get splinters from. That would put a damper on your fun!
Onto painting! The photos are a bit out of order - I hadn't charged my drill - and I got a head start on painting before finish the cuts. There are some tricks that can make the painting go easier. I was going for a three-tone design, with two lines leading up to the hole. First I laid down a strip of painters tape for where I wanted the line to go, and painted around it.
Running a razor blade (or x-acto knife) along the edge of the tape helps it peel up without dragging the paint up with it.
I also used the x-acto knife and the lid I drew the circle with to cut a nice circle out of the ring of tape around the edge. This left a nice circle when I painted the highlight strips.
Finally, attach the legs with a couple of screws (this prevents them from rotating). Don't forget to counter-sink the screws, so you don't have the heads sticking up waiting to catch someone's finger.
You may have to do some touch-up work, but we're done with the boards. Now onto the bags.
I used some split-peas for filler, as they have a nice smooth feel to them (it must have looked pretty strange to see me feeling up all the beans in the store). I measured out ~5.3 oz as a good weight, which used 2 16oz bags of beans for the 6 bags. As you can see, I was very careful about measuring out the beans :p.
Finally, we used some old cloth we had lying around for the bags, which are sewn just like a pillow - inside out and the flipped, filled, and sealed.
All done! Grab a cold soda and enjoy your handi-work.
Tools:
- Jigsaw
- Hand drill
- Sandpaper
- Painter's tape (optional)
- Paintbrush
- Coutersink / drill bits / screwdriver bit
Supplies:
- Plywood (spare, probably ~$10)
- 2"x2" furring strip ($2)
- Screws (8x ~$5 for a large pack)
- Paint (I used some old latex paint we had lying about ~$5)
- Cloth (spare, ~$2)
- Beans ($4)
Total: ~$28
Cracked Screen
Disaster hath struck:


Guess it's time to invest in a case.
I've been running my tablets "naked" (shorthand for without a screen protector) and it's finally taken a toll.
How it happened: The Note was balanced right on the edge of stability on the table edge. A small nudge sent it flipping over and it landed flat, face down, on a tile floor.
Interestingly, I've dropped the Nook 3-4 times now, and its screen is still in perfect condition. I think there are two main differences here;
- The Nook has a smaller screen, so for a given thickness of glass the aspect ratio (diagonal to thickness) is smaller for the smaller screen, providing added strength.
- The Nook impacts have all been at an angle and not face-on.
Repair: I always like to do things myself, but after watching a few videos on removing the screen on YouTube, I opted to find some professionals with some more experience. The screen replacement cost $130, about half as much as I had initially purchased the tablet for on ebay (ouch!). The screen repair shop I went to was very professional though - they had obviously done this before (they had 2-3 Note's sitting in various stages of disrepair) and had a good turn-around time of four days (including the weekend).
The one down-side is that they weren't able to source the dark-gray screen, so the front of my tablet is now white:
But it works mostly as well as before! The new digitizer works well with the pen - it's responsive and there are no dead-zones. But there are a couple of new dead-zones for touch (right where the spacebar / web navigation tab is in portrait mode. Unfortunately, that is really annoying spot for a dead zone. Still it works, and works well enough.
Guess it's time to invest in a case.
The Coffee Table
From the archives: Here's one of our first projects, a coffee table. The apartment had this incredible empty space between the couch and the TV, plus there were absolutely no flat surfaces on which to rest anything. While I was going to go for the eminently practical plywood on my favorite 2x2 furring strips, the better half convinced me to make it a bit more artistic. Together we browsed through the hardware store and found these fantastic tiles. After about a month of hard work, we ended up with this table:
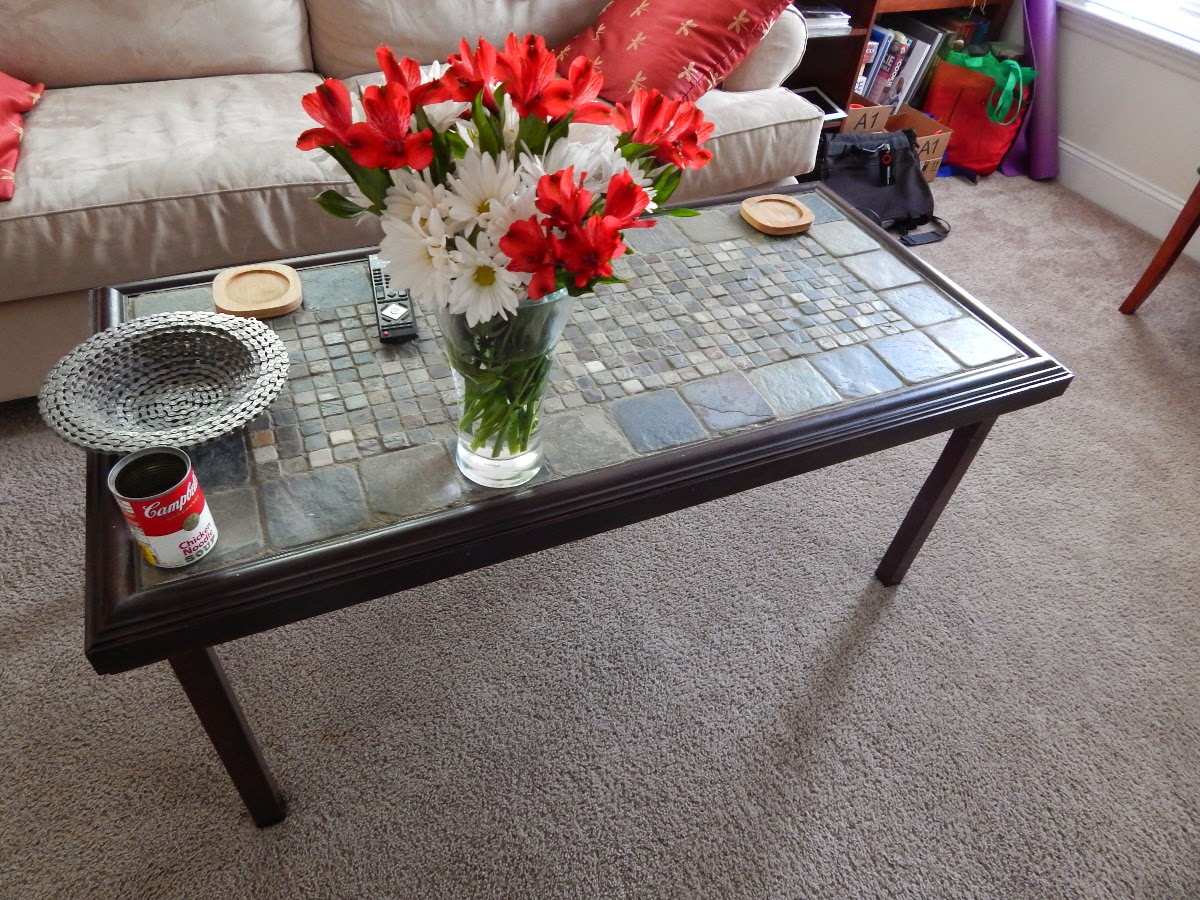
As far as construction goes, there's a plywood surface, under which there is an open frame of furring strips, with the four legs going into the corners and reinforced / held into place with an angled strip:


On the top, we boxed in the center with some trim, then smeared out the tile adhesive, placed the tiles down and added all the grout. Unfortunately one tub of grout didn't quite cover it, and we had to go back for another tub.

Also, the tiny tiles are horrible to grout, they take forever. We also went ahead and sealed the grout to help protect the surface. The final product was well worth all the effort. We think it's a fantastic table and one we'll certainly have for awhile.
Tools:
As far as construction goes, there's a plywood surface, under which there is an open frame of furring strips, with the four legs going into the corners and reinforced / held into place with an angled strip:
On the top, we boxed in the center with some trim, then smeared out the tile adhesive, placed the tiles down and added all the grout. Unfortunately one tub of grout didn't quite cover it, and we had to go back for another tub.
Also, the tiny tiles are horrible to grout, they take forever. We also went ahead and sealed the grout to help protect the surface. The final product was well worth all the effort. We think it's a fantastic table and one we'll certainly have for awhile.
Tools:
- Miter box and saw
- Screwdriver / drill
- Tools: $20
- Supplies: $150
- Total: $170
Weekend Project - Floor Lamp
I've wanted to make a Japanese-themed floor lamp to go in our reading nook for quite a while now, and finally got off of my rear to do it. I'll lead off with the beauty shot of it in place, because it really is quite nice.

I wasn't able to find 1"x1" wood anywhere (the actual dimensions are closer to 3/4" square), so I had to cut a 2"x1" in half the long way. I wanted a lamp that would be 4' tall, and around 8" wide. These measurements worked out perfectly, as with one 12' section of board, I was able to cut out 4, 4' lengths for the corners and 12, 7.5" lengths for the lattice.

After a quick stain, I hot-glued each of the four corners with the three of the connecting pieces, and then nailed them together. Two of the corners were then combined, so I had two components of one full side and one partial side.


The longest part of this project was trying to find some good paper. I could only find industrial size sheets of Japanese rice-paper, and eventually settled on tracing paper. The tracing paper worked out very well in the end. With the paper selected, I just hot-glued it to each of the two complete sides.

Next up, the sides were joined together with a cross bar formed from a dowel running through the center. This will allow us to hang the bulb for the lamp.

With that done, the next two sides were covered with paper (the final side is quite difficult once the other three are covered). And you can see that it lights up nicely.

Back to the saw and staining to cut some trim for the base.


With that glued together, the final segments of the paper go in, and we're done.

Here's a cool looking view from the top.

That covers the structure of the lamp. Just as important is the electrical component. This isn't too difficult; it comprises of an electrical cord, a switch, and a socket. I thought I would try something different here, and made a video of the wiring process. Remember to use all safety precautions.
I wasn't able to find 1"x1" wood anywhere (the actual dimensions are closer to 3/4" square), so I had to cut a 2"x1" in half the long way. I wanted a lamp that would be 4' tall, and around 8" wide. These measurements worked out perfectly, as with one 12' section of board, I was able to cut out 4, 4' lengths for the corners and 12, 7.5" lengths for the lattice.
After a quick stain, I hot-glued each of the four corners with the three of the connecting pieces, and then nailed them together. Two of the corners were then combined, so I had two components of one full side and one partial side.
The longest part of this project was trying to find some good paper. I could only find industrial size sheets of Japanese rice-paper, and eventually settled on tracing paper. The tracing paper worked out very well in the end. With the paper selected, I just hot-glued it to each of the two complete sides.
Next up, the sides were joined together with a cross bar formed from a dowel running through the center. This will allow us to hang the bulb for the lamp.
With that done, the next two sides were covered with paper (the final side is quite difficult once the other three are covered). And you can see that it lights up nicely.
Back to the saw and staining to cut some trim for the base.
With that glued together, the final segments of the paper go in, and we're done.
Here's a cool looking view from the top.
That covers the structure of the lamp. Just as important is the electrical component. This isn't too difficult; it comprises of an electrical cord, a switch, and a socket. I thought I would try something different here, and made a video of the wiring process. Remember to use all safety precautions.
This project was fairly easy and straightforward. Having done it there are a few things I would have done differently, however. Mainly, I would have used a few more cross supports. This would have meant that the windows would have been smaller, which would have made it much easier to find paper to fit (I could have gone with the next size down, rather than the largest tracing paper size). If you look closely, you can also see that for the lowest window, the paper is glued to the base. Again, if there were more cross beams, I could have placed one at the base as well. All in all, you can't tell unless you know what to look for (so perhaps I shouldn't have told you ;) ), and I'm very pleased with the glow it gives the reading nook.
Here's the breakdown:
Costs:
- $19 - Wood
- $5 - Stain (I ran out of the old stuff)
- $8 - Electrical bits & pieces
- $13 - Paper
- Total: $45
Tools:
- Jigsaw
- Random Orbit Sander (only because I had to slice the wood in the beginning, you could do it all with pre-sanded trim)
- Miterbox & handsaw
- Nailgun (I wish, this would have made it so much easier to do the frame)
The Android Family
Having recently acquired a larger tablet, I thought I would provide an overview of my devices for those who are curious about getting one of their own and would like to see how the different sizes lend themselves to different uses. This isn't going to be a technical post - you can find the details already on the web. Instead I'll just discuss how I use them.

Let's break down the contents of that photo. The largest is a 10.1" Samsung Galaxy Note, about a year and a half old, but most recently acquired. The midsize one is also the oldest; a Barnes and Noble Nook Color. And the smallest is the Motorola Razr M; the only one actually equipped to make telephone calls.
Before I get started, here are a few more comparison photos:
Nook Color
The Nook Color was my first Android purchase, and its use reflects that. While I could have gotten a phone, I didn't want to pay for the extra data plans at the time. But I did want to get into the Android dev scene. And the Nook is stellar for that. Being one of the few tablets at the time, it was picked up and quickly hacked. Enthusiasts had their own version of Android running, and unlocked additional features such as; overclocking, audio compensation, and Bluetooth. The inclusion of an SD Card made it easy enough to run the unlocked OS from it, and to recover it should something go wrong. I picked mine up in 2011, and the first thing I did was root it. I've never regretted that. As you can see I'm still hacking away at the Nook. So it's served that use above and beyond the call of duty.
For the more casual consumer, I think it still offers a useful place, albeit one that is better served by the more recent Nexus 7. It's screen is large enough to browse the web comfortably, but it shines when reading books. I find the size is great for one-handed reading, either books or blogs. More modern devices are lighter, which is great for long-term reading. The speed improvement you get from a more modern device only really impacts web-rendering - I don't notice any difference when reading books from the Nook App or through my local library. It does a good job at games too, again the screen being a nice compromise between small enough to hold and large enough to see.
Galaxy Note 10.1
The Note 10.1 is an interesting mix of work, web, and games. On one hand it has pretty much entirely replaced my work notebook. The Papyrus app is absolutely fantastic - it integrates hand-written notes with pictures, etc. and makes for a much more dynamic notebook. It also supports cloud backups. Secondly, the screen's large enough that I can read research papers comfortably. Not only can I read, but the pen allows for nice annotations (which you can later read). I use Mendeley for my research papers, and Scholarley is well worth the full-version (if only for the batch document sync) - keeping my papers up to date and available. These two features alone make the tablet very much worth it - I don't have to haul papers back and forth, and have all of my notes available wherever I am.
On the other fronts, the large screen excels as well. This is the only of the three devices that the wife is willing to use for web-browsing. Mainly because it is so much larger and easier to navigate. It works for casual reading as well. RSS feeds render and feel great, but I find books to be just a little too large & cumbersome. Conversely many apps, such as Twitter, are made for the smaller screens and don't take advantage of the available screen area.
Since this is one of the more recent devices, the processing power really makes gaming much more enjoyable than on the Nook (which just doesn't have quite enough to make some high-detail games fluid). The battery on the Note is fantastic, though. It will power through a full day of (sparse) note-taking and reading and then still have enough for web-browsing and games at home.
Motorola Razr M
As I mentioned above, this is the one with cell service, and that's where I really use it. Since I have larger screens available and prefer using them for reading / gaming, I have a paired down app-list on the phone. Here's the entire install list I have;
If I had to recommend just one to you - I'd have go go with a modern 7" tablet. The phone is great for the connectivity, but I was getting along without it fine before. And modern 7"ers come with GPS / cameras, which is the one area I find the Nook lacking. Similarly it's great for reading and games. So if you're just looking to dip your toes in, the 7" market is a good place to start.
Still, your needs may not be lined up with my own, but perhaps you can use the info above to help figure out exactly which size fits your needs the best.
Let's break down the contents of that photo. The largest is a 10.1" Samsung Galaxy Note, about a year and a half old, but most recently acquired. The midsize one is also the oldest; a Barnes and Noble Nook Color. And the smallest is the Motorola Razr M; the only one actually equipped to make telephone calls.
Before I get started, here are a few more comparison photos:
 |
| The screens laid out on top of one another. The 4" phone comfortably fits in the pocket. The 7" nook is a squeeze. The 10" tab is nae gonna fit. |
 |
| Height-wise, they're all fairly similar. I've never noticed this being a deal-breaker. |
 |
| The screens are all fantastic. The nook has an easy brightness adjust and gets plenty bright to use outdoors. The phone could use a quick brightness adjust for daylight use, though. |
The Nook Color was my first Android purchase, and its use reflects that. While I could have gotten a phone, I didn't want to pay for the extra data plans at the time. But I did want to get into the Android dev scene. And the Nook is stellar for that. Being one of the few tablets at the time, it was picked up and quickly hacked. Enthusiasts had their own version of Android running, and unlocked additional features such as; overclocking, audio compensation, and Bluetooth. The inclusion of an SD Card made it easy enough to run the unlocked OS from it, and to recover it should something go wrong. I picked mine up in 2011, and the first thing I did was root it. I've never regretted that. As you can see I'm still hacking away at the Nook. So it's served that use above and beyond the call of duty.
For the more casual consumer, I think it still offers a useful place, albeit one that is better served by the more recent Nexus 7. It's screen is large enough to browse the web comfortably, but it shines when reading books. I find the size is great for one-handed reading, either books or blogs. More modern devices are lighter, which is great for long-term reading. The speed improvement you get from a more modern device only really impacts web-rendering - I don't notice any difference when reading books from the Nook App or through my local library. It does a good job at games too, again the screen being a nice compromise between small enough to hold and large enough to see.
Galaxy Note 10.1
The Note 10.1 is an interesting mix of work, web, and games. On one hand it has pretty much entirely replaced my work notebook. The Papyrus app is absolutely fantastic - it integrates hand-written notes with pictures, etc. and makes for a much more dynamic notebook. It also supports cloud backups. Secondly, the screen's large enough that I can read research papers comfortably. Not only can I read, but the pen allows for nice annotations (which you can later read). I use Mendeley for my research papers, and Scholarley is well worth the full-version (if only for the batch document sync) - keeping my papers up to date and available. These two features alone make the tablet very much worth it - I don't have to haul papers back and forth, and have all of my notes available wherever I am.
On the other fronts, the large screen excels as well. This is the only of the three devices that the wife is willing to use for web-browsing. Mainly because it is so much larger and easier to navigate. It works for casual reading as well. RSS feeds render and feel great, but I find books to be just a little too large & cumbersome. Conversely many apps, such as Twitter, are made for the smaller screens and don't take advantage of the available screen area.
Since this is one of the more recent devices, the processing power really makes gaming much more enjoyable than on the Nook (which just doesn't have quite enough to make some high-detail games fluid). The battery on the Note is fantastic, though. It will power through a full day of (sparse) note-taking and reading and then still have enough for web-browsing and games at home.
Motorola Razr M
As I mentioned above, this is the one with cell service, and that's where I really use it. Since I have larger screens available and prefer using them for reading / gaming, I have a paired down app-list on the phone. Here's the entire install list I have;
- Connectivity
- Phone
- IM
- Maps
- Work
- Calendar
- Task sync
- Time tracker
- Cloud
- Music (2-3 services)
- Storage (dropbox / drive / evernote / scholarly (pdfs not synced) )
- Twitter (I find I'm posting mostly from the phone)
- Utils
- VPN
- SSH
- File explorer
- Misc
- Camera
- NFC / QR
- Bluetooth utilities
If I had to recommend just one to you - I'd have go go with a modern 7" tablet. The phone is great for the connectivity, but I was getting along without it fine before. And modern 7"ers come with GPS / cameras, which is the one area I find the Nook lacking. Similarly it's great for reading and games. So if you're just looking to dip your toes in, the 7" market is a good place to start.
Still, your needs may not be lined up with my own, but perhaps you can use the info above to help figure out exactly which size fits your needs the best.
Weekend (tech) Project: Building CM11
I finally decided to dive into the deep end and compile Android from source!
This is not a complete how-to post. I'm writing this first to help you troubleshoot your own build and show where you might run into trouble. Primarily, though it's my notes for the next time I build.

First off, I'm building this in Ubuntu. Also, this is going to use some hard disk space. Make sure that at least 37 (more safely 40) GB is available. I didn't have quite this much available on my linux partition, so I plugged in my external HDD. You have to make sure that you have read-write-execute permissions to the mounted drive. The easiest way I found to do this is to use;
http://wiki.cyanogenmod.org/w/Build_for_encore
with backup from this thread;
http://forum.xda-developers.com/showthread.php?t=1370873
Before you run envsetup and breakfast, you need to add a file, here's the description:


This is not a complete how-to post. I'm writing this first to help you troubleshoot your own build and show where you might run into trouble. Primarily, though it's my notes for the next time I build.
Building:
First off, I'm building this in Ubuntu. Also, this is going to use some hard disk space. Make sure that at least 37 (more safely 40) GB is available. I didn't have quite this much available on my linux partition, so I plugged in my external HDD. You have to make sure that you have read-write-execute permissions to the mounted drive. The easiest way I found to do this is to use;
- sudo umount /media/madscientist/MyExternalHDDsudo mount -t ntfs-3g /dev/sd** /media/madscientist
- sudo fdisk -l
http://wiki.cyanogenmod.org/w/Build_for_encore
with backup from this thread;
http://forum.xda-developers.com/showthread.php?t=1370873
Before you run envsetup and breakfast, you need to add a file, here's the description:
Have you set up your local manifest file to use the NookieDevs repo? If not, here is one that will work. This goes in the file [source directory]/.repo/local_manifests/roomservice.xmlAfter this, you may need to re-run repo sync.
<?xml version="1.0" encoding="UTF-8"?>
<manifest>
<project name="NookieDevs/android_device_bn_encore" path="device/bn/encore" remote="github" revision="cm-11.0" />
<project name="CyanogenMod/android_kernel_bn_encore" path="kernel/bn/encore" remote="github" revision="encore-omap3-3.0.y" />
</manifest>
Okay, now my nook isn’t showing up on usb. Trying to find adb_usb.ini to edit as per;
http://wiki.cyanogenmod.org/w/Doc:_adb_intro#.22Device_not_found.22_errors
Finally, I found the file in; ~/.android/adb_usb.ini and could add the code: 0x2080
With this done, I restarted the adb server (adb kill-server, adb start-server).
You'll have to answer a dialog on the nook to confirm that the computer is allowed to run usb debugging. With this done I was able to attach to the debugger.
(Another useful site for nook usb info is here; http://nookdevs.com/NookColor_USB_ADB)
This allowed me to run;
Then you can run the build as normal. From here on out I didn't have a problem building.
This allowed me to run;
- ~/Build/android/system/device/bn/encore$ ./extract-files.sh
Then you can run the build as normal. From here on out I didn't have a problem building.
Installing:
Before you install, you ABSOLUTELY MUST back up your existing ROM. This makes it so very much easier to get back to a working state if something goes wrong. Like having an out-of-date recovery image....
When installing the build I encountered a “Build failed status 7” as per this thread
http://forum.xda-developers.com/showpost.php?p=47672324&postcount=353
This was because the recovery image was out of date. To install the latest recovery image, I followed the directions from http://nookdevs.com/CWR_Manual_Installation in which you’ll need to mount and copy some files over via adb. Here's the dump of my command line history:
- adb shell mount -o rw,remount /
- adb shell mkdir /boot
- adb shell mount /dev/block/mmcblk0p1 /boot
- adb shell mv /boot/uRecImg /boot/uRecImg.stock
- adb shell mv /boot/uRecRam /boot/uRecRam.stock
- adb push /buildpath/android/system/out/target/product/encore/kernel /boot/uRecImg
- adb push /buildpath/android/system/out/target/product/encore/ramdisk-recovery.ub /boot/uRecRam
This brought me to CWM-based recovery v6.0.4.6, which looks promising as google seems to associate this with CM11.
This worked - CM11 was up and running!
Grab the latest gapps from CM’s website (http://wiki.cyanogenmod.org/w/Google_Apps) and you're done!
Grab the latest gapps from CM’s website (http://wiki.cyanogenmod.org/w/Google_Apps) and you're done!
Subscribe to:
Posts (Atom)