Weekend Project - Hat Rack

  Here's another quick weekend project we undertook. After having our hats laying around on chairs and coffee tables, I finally decided that it was time to give them a dedicated place. So we brainstormed some ideas, and thought it would be a neat idea to have a "his and hers" hat rack, or even better, a "Mr. and Mrs." hat rack.
  We picked up a pine sign plaque from a hobby store, and then some hooks from the local hardware store. After some quick staining, sealing, and screwing in the hardware (I opted for slightly smaller than the stock screws so they wouldn't go through the other side), the sign was ready for some customization.
Cutting out the stencil
  In an attempt to make nice clean text, I set down a layer of tape and then a print out of a nice font with above it. Tracing over the font with moderate pressure using an exact o-knife cut through the paper and the tape. As a tip, i would recommend not layering the tape on itself, this gave me some trouble later.

Trace the stencil with the knife again for easy removal


 After tracing with the knife and removing the stencil and tape, it was ready for a layer of paint. This is just a craft-acrylic paint laid down over the tape stencil.
Careful scraping can remove the stray paint.


  When removing the tape, I found it very useful to trace around the stencil with the exact o-knife again. This separated the paint on the wood from the paint on the tape. Hence, the tape was much less likely to peel up any paint with it (the 's' above suffered while I figured this out - but I'll just say it's an antique look).
The finished product!
It's practical too!
Here's the final product with all the tape removed and looking snazzy up on the wall. A couple of 1/4 inch drill holes in the back provide a recess for the nails. Just be careful not to go all the way through the board.


This was a pretty quick, cheap, and unique project that really adds some nice personality to the entrance by the door. Now for the usual breakdown:

Tools:
  • Sandpaper, stain, sealant, acrylic paint.
  • Screwdriver / drill
Price:
  • Tools: Used our existing stock.
  • Supplies: $8 (sign) $10 (hardware)
  • Total: $18

Rooted Nook - Borrowing e-books

  I'm always looking for another trick to teach my rooted Nook Color e-reader, so when I found out I could 'borrow' library books to read, I just had to give it a try. I'll be using my local library, the Durham County Library, which uses OverDrive and Adobe Digital Editions to provide it's e-book lending. Your library may also use OverDrive (they seem to be pretty popular), and if they do this guide should work for you as well. If not, the best resource for you to go to would be the library itself, take your e-reader and they likely have someone on staff who can teach you how to set it up.
  I found our library has a great online reference that you may want to have a look at; the DCL's e-book basics guide. This guide is an in-depth look at that guide with some hiccups I encountered along the way. You should already be set up with a physical library card and a PIN that you set when you made the card (four digits - try the last 4 from your phone number if you don't remember).

  You can do this one of two ways, first I'll cover using Adobe to transfer the file to the Nook and then using the Nook reader app to view it. You should be able to use this method with any version of the Nook - either the original, touch, Color, Tablet, or rooted Color, like me. You'll need Adobe Digital Editions (download from the link above) and an account with Adobe. Here's where I ran into my first problem - I had to go through the process of making an account three times until it finally sent out the confirmation e-mail to my account. If you'd like to see a larger version of one of the images below, just click on them.

  From the library 
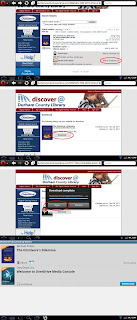
eBook page click on the OverDrive link and start browsing for books. I'll be downloading Fool Moon (#2 of the Dresden files).
  You can select either 7 or 14 days as a checkout period (top highlight - didn't see that the first time through), and then proceed to checkout. At checkout you'll need your library number (on the back of the card or key-ring dongle), and your PIN.
 Once you've checked out, you can "download the book" to your computer. Here's another catch - you don't actually download the book, you download a file that Adobe Digital Editions reads and uses to download the book from their server. Make sure you know where the file downloads too (check the \My Documents\Downloads\ folder).
   To get the book to appear in Adobe, just drag that file you downloaded onto the Adobe Digital Editions icon, it will download the book and you can now view it on your computer. But wait! You say, I wanted to view it on my Nook. Well I do to, so hold on.
  Grab your nook and use the USB cable to plug it in, then turn on file transfer. If you're like me and are rooted using CM 7 (grab the latest stable or more recent nightly - I'm running n253 at the time of this writing) pull up the status bar (1) and enable file transfer (2). I'm not sure how it looks if you're running the stock OS.

  Adobe Digital Editions should now recognize the device and suggest that you authorize it. It will notice both the "MyNOOKcolor" (which is the emmc or internal memory) and your SD card (mine is called NOOKSD, creative, I know ). You want to authorize the drive where you installed the Nook app (you can authorize both if you want to), then drag and drop the title to that drive.


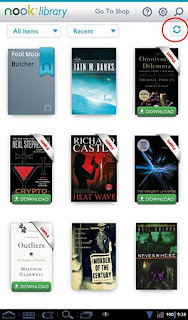
  Turn off file sharing on the Nook and disconnect it, then launch the Nook app. Once you hit refresh in the corner, you should see the library e-book appear. You're all done, enjoy the read!

  When you're done, launch Adobe Digital editions again, and from the library view (where you see the pictures of the covers), click the arrow in the upper left corner, this will bring up an options menu for the book. This will have the opportunity to return the book early if you wish. Otherwise, it will expire after the lending period is over and remove itself from you library.


  What do you do if you don't have a computer or USB access? There's still a way to get the book onto your nook, we'll go through OverDrive directly. First grab the OverDrive app from the market (I'm not seeing it in the B&N market, as of this writing keep trying perhaps they'll have it in the future). The above directions should still work for stock users though.

  Once you're in Overdrive (leftmost image) click menu, and then "Get Books". This will bring you to the add a library page if you haven't been here before, go ahead and click the add library, and enter the zip code on the next screen.


   Once you have a library associated, clicking on it, will bring up the web browser and direct you over to the e-book search for your library (I'm using Opera mobile, yours may look different)
  Here I've searched for "The Omnivore's Dilemma", select Adobe ePub book and follow the same sequence of download it as you did before; choose the checkout period and enter your library number (on the back of your card, or key dongle), and your PIN. You'll download a file, but again, this isn't the eBook itself. Choose to open the file with OverDrive (if you're even given an option) and OverDrive will begin to download the eBook. When it's done it will appear in your OverDrive library and you can read away!
  The OverDrive reader looks pretty simple, but it has most of the features you're used to from the Nook reader. Simply tap on the menu key to bring up the main menu of options (font size, style, brightness, etc.). I was unable to find a way to get the Nook app to display the book. If you are able to please drop me a line in the comments, I would like to hear it.

   When you're done with the book, long-press it in the OverDrive app and then select delete. This will bring up a menu of options, from which you can return the book early. One nice thing is that you can see exactly how many days you have remaining from the main library screen, after which the book will be removed from the library.


  That's all there is to it, I hope you make use of your local library's eBook lending options. I know I'm really enjoying being able to check out a book any time of day without having to drive to the library!


  Epilogue; Those of you who know me, are probably quite aware of my enthusiasm for my rooted Nook Color. Are you surprised I haven't posted the rooting process here? Yeah, so am I. I may post my collected tricks at some point, but I would really recommend visiting the xda-developers forums - there is usually a post there to guide you through whatever trouble there is, and there are plenty on rooting and your options for doing it.

Bedside Tables - Part III

  Finally decided to get a sander - and boy am I glad I did! We really could have used it for all of our previous projects. After reading up a bit on sanders we opted for getting a 5-inch random orbital sander with the hook and loop sanding pads. [Aside; it never clicked with me that "hook-and-loop" equates to "Velcro", I was worried that I'd be wrestling with the sander threading some crazy loop mechanism through sanding pads!]
  The sander definitely makes sanding easier - I was able to finish off one of the sanding passes in one evening, whereas one pass would take me two evenings before (and I made two passes before this, just if you were wondering what was taking these posts so long). Unfortunately, we noticed that my hand-sanding from before had inadvertently made some light-scratches on the surface. The random-orbital sander, because of the 'randomness' in the vibration does a good job of avoid this. You can go either with or against the grain with the random orbital sander, and as long as you don't push down very hard, or angle so the edges of the sander bite into the wood, you shouldn't leave any scratches and you should have a nice smooth sanded surface at the end.
Brackets attached to the parts, waiting to be put together.
A close-up of the finished product.
  Post Sanding, we stained the wood, placing two coats of our favored "dark cherry" stain that we've used on all our other projects, on all the sides and edges. We finished up with a quick coat of spray polyurethane sealant, although we'll likely go over the finished product with a paint-on polyurethane sealant.
  With everything sanded and sealed, it was time for partial assembly (we still have to cut, sand, and stain the sides and doors). You can see from the photo, that I opted for thin, 2 screw corner brackets, which I first put on the shelves and the top of the legs. I'm a big fan of pilot holes, and there are some on the legs and top waiting for the screws.
  A very small dab of glue accompanied the legs as they were screwed into the top. Once all were in, I inched the shelves between the four legs and screwed them into place. For each shelf, the brackets were first screwed to the shelf. Then I partially screwed in the screws connecting them to the legs, only tightening them down fully once all were in.
The two tables partly assembled!

  Volia! They're assembled and starting to look light nightstands. Now we just need to finish off the sides, which should prove an interesting exercise with the jigsaw - I've yet to perform an cut with the jigsaw blade at an angle. The final steps will be deciding on the door mechanisms and the hardware. Still, it's nice having a picture of what they'll look like when finished. And they seem to be a good height next to the bed (couldn't help taking them up there for a trial).

Bedside Tables Part II

  Here's the physical start to the bedside tables. I've already cut the table legs and the shelves (see the photo to the right). However, I still need to cut the corners off of the shelves to get the desired look. So here's a detailed look at this step.
  Of course, you'll need a few tools, here are mine; a jigsaw and a couple of clamps. I also have a folding table that you can see in the next picture.

  I clamped a guide board to the bench, and am using it to pin the shelf to the bench. I have a couple of shims to help keep everything almost the same height. While cutting, I make sure to put my weight on the guide board, preventing the work piece from moving. At this point, it's still adjustable slightly so I can make sure the saw will cut through at the right points.


  Check that the saw-blade lines up, both where the blade will start and finish cutting the wood. Make sure that the edge of the blade is on the line, and not the center of the blade. Otherwise your cut will be smaller than you want it to be, as the blade will annihilate the wood in it's path, and then a little bit.

  Four cuts later, we have one done! I think they look pretty good, and also reminiscent of something out of the Battlestar remake. Trim the corners to keep the Cylons from assembling the tables.
  Here's a glimpse of what it will look like when finished the inner shelves are a few inches smaller than the top shelf such that the legs are flush with both shelves. When this is finished, it should give it a nice recessed look along the sides and front, while hiding the ugly plywood edges of the sides.
Here are some "pro tips" I've learned while cutting the 24 corners off of the shelves. First the one I knew going in;
Face the edge you want to look nice downward (on the opposite side as the jigsaw).
  The orbital jigsaw blade moves down, forward, and then up, the amount of forward and back is what gives it the orbital name, and most orbital jigsaws allow you to adjust the amount of forward and back motion. For instance, I usually set mine to cut with a light orbital action on plywood because I want a fairly reasonable finish (our plywood is going towards furniture after all), however, you could set it to a larger reciprocal (back and forth) action for rougher, but faster, cutting along plywood.

  I also noticed that the direction of the grain matters. If at all possible, aligning the grain direction with the direction of the jigsaw cut produces a much smoother and nicer cut. It seems when it cuts against the grain, it is more likely to catch and pull up splinters.
  Well, that's the cutting of the main pieces of the bedside tables. Next up will be sanding and staining, followed by putting these pieces together.

FiO/LS 2011 - The Tech

  I took some time off during the Wednesday sessions, as I was having information overload and need some time to recharge my brain for another few rounds of information dump. To chill out, I visited The Tech which is a science museum with an emphasis on technology and interactivity. It was very nicely done, and I had a good time - if I were a kid again you'd have a really tough time getting me out! I was only able to spend a couple of hours in the museum, but there's certainly enough there for a full day.

  One of the first exhibits I encountered on the top floor was this nifty robot arm. You could get your picture taken at a station nearby, and the arm would then draw your portrait.
  Another nearby robot would re-arrange wooden letter blocks until you asked it to spell your name, when it would kindly oblige.

  Around the top floor, they also had some nice exhibits on digital logic and programming microchips (we are in Silicon Valley after all). These consisted of a Mr. Potato Head whose clear head showed off his microchip brain, in a room with lights, fans, thermometers, etc. that you could control. By placing labeled blocks in slots you created a logic chain that would cause Mr. Potato Head to perform some action. For instance, the chain could read "Light is on" "and" "Mr. Potato Head is hot" then "Speak". You then sent these commands to the PIC brain, and he would execute them if the conditions were right. So if the light was on and the fan was off, the temperature would rise, and Mr. Potato Head would start talking.

  They also had nice DNA exhibit, the best part of which was a functioning wet lab. Of course, I had to test it out. I was quite impressed, they had the ingredients (e. coli? and gfp? plasmids) nicely laid out, a how-to video which you followed at your own pace, and included the proper safety procedures; goggles and gloves. They walked you through the entire process of getting the bacteria to uptake the genes by heat-shocking them. Since the bacteria need some time to grow, you incubate overnight and then can check back on them via their on-line interface.

My two bacterial colonies!

A double helix of books
The nerve center.
  Speaking of the online interface, it was well done; the events had barcode scanners that would scan your ticket, and you log in to their website using a number from your ticket. Once online you can check back on the exhibits, and items you may have 'collected'. Admittedly from a review point, I should probably have taken more advantage of this, but at the time I wasn't that interested, so I only scanned the bacteria station above. Those electronic looking racks to the left are the servers.


I think I'm in the monitor at the lower left...
  This was one of the best - it was a remote controlled submarine. They had three in a tank and had them returning video feeds, so you could see things through the sub camera you otherwise would not be able to see. A perfect demonstration of why this tech is used. The pic is an attempted self-portrait, but I was having difficulty keeping the sub stable with one hand.

  Also on the lower level was an awesome demonstration of NASA's Extravehicular Mobility Unit (powered space suit). A chair had several compressed air jets to levitate it, and then a few more for control. Excluding the minor friction I noticed (which may have had something to do with the fact that I'm about a hundred more pounds heavier than their target 7 year old), it was a good demonstration of what the astronauts have to deal with to maneuver in space.

Tracks of flights across the globe.
  The photo on the left is of another exhibit that I quite enjoyed. The globe shows the track of planes as they traverse the globe. It was part of a station that showed how we monitor global weather, of which planes play a part.

  Overall this was a fantastic museum: I was only able to spend a couple of hours here, but one could easily loose a day or two in these very interactive halls.

FiO/LS 2011 - Pictures

The hotel the conference was located at.
The view from our room.
The church across the other way.

The hotel across the way.


The swanky hotel lobby.
Nice nighttime lighting.

The Museum of Art during the day.
Same Museum of Art lit during the night.
The flight back - ahh mountains!

FiO/LS 2011 - Thursday Sessions

  Chronologically, this came right before the flight back. As a consequence, I was only able to attend a few talks in the morning, but they were talks with some good ideas behind them.

  The first one was on adaptive optics in microscopy. Instead of using a wave-front sensor to measure aberrations in their beam of light, they were using the signal generated (the brightness of their image) as their metric for correction. This only worked because it was a nonlinear microscope, so their signal gets much stronger when more light is concentrated at the focus, as opposed to a linear microscope, where the signal would be equally strong regardless of where the light was smeared to. It's a neat idea, but I'm not sure that rate of adjustment necessarily justifies the image enhancement in my case. They have to use 2n-1 images to correct for aberrations in n modes; for correction of the first 3 main optics induced errors, this would be 5 images. So while this would probably be okay for a microscope that can do an image in a half-second, it's not particularly applicable to my 30 minute scan times. While ideally I would only have to do this correction once for each optical system, I'm taking down and re-assembling frequently enough that an investment in the required spatial light modulator doesn't justify itself in my mind.

  The second was a case of 1 + 2 = cool. Take: 1) What do astronomers want? Larger telescopes of course! 2) What do solar power stations do during the night? Not much of course! But if we put these two together, we could make a giant telescope from a solar concentrator. The design issues are still being worked out, primarily because the solar concentrator they're looking at does not have parabolic (curved) mirrors to concentrate the light. So each plane reflects light onto the generator (now detector), and they have to have an intriguingly redundant array of sensors that needs to not only piece together how an image is supposed to be formed, but also correct for the non-smoothness of the panes (hence why this appeared in the wave-front aberration session). This would be easier if the mirrors were curved, because then they would have a focus, and with that they could form an image at a detector.

  Anyway, I understand that this was somewhat brief, but if you ever want more details or clarifications, feel free to leave a note in the comments below.

Fiao/LS 2011 - Travelling back

<p>I'll likely be writing on the plane, but I am also just as likely to not have wireless, so the next substantial post will have to wait until I'm back home. Of the two talks I was able to snag this morning, they were both good, so I'm looking forward to sharing those ideas when I get back.</p>

FiO/LS 2011 - Wednesday Sessions

    Today was quite the whirlwind, after getting breakfast in the morning, I went off to a room that I hadn't been to before. Unfortunately, I thought it was somewhere else, so I ended up circling the conference center and coming back to the room right above the coffee shop. And this was after I had my morning coffee... sigh...

    Anyway, there were a few gems of talks today. The first was a talk by Mark Foster on his work doing time lensing - essentially using an all fiber setup to shift the pattern in the spectrum of light into the time domain, and the time domain into the spectral domain. This is cool stuff because in telecom they have well developed methods for handling one type of signal but not the other, so by having an all fiber way of switching between the two makes it easy to modify either signal. This could lead to faster bandwidth with only minimal overhead. It turns out that you can use a similar method to do extra-precise analog to digital conversion by using a pulsed laser (which has very small timing jitter of about 5 fs, that's 5*10^-15 s) to do the sampling, then stretch the samples out a bit so that an electronic ADC can pick it up (these have timing jitter of about 100 fs). So you pick up a factor of 10-100 accuracy by this method.

    The rest of the morning wasn't particularly my field, so I didn't get a lot out of it. Consequently I went off to The Tech Museum to have some fun, but also decompress and get my brain ready for more talks. I had a really good time there, and to do it justice, I think I'll make a separate post (with pictures).

    By the time the afternoon rolled around, a few more talks popped up on my radar. First up was a talk by Eric Van Stryland's group on their work in seeding supercontinuum (SC) generation. I mentioned this briefly before, but the idea is that if you go through special optical fibers or, in this case, a krypton gas cell you can turn a short laser pulse of a few frequencies (about 100 nm bandwidth) into a longer pulse of many more frequencies (usually spanning the visible, from 400 nm (deep purple) to 800 nm (red) and even longer wavelengths). Since supercontinuum generation is the result from a plethora of nonlinear processes, you have to have very intense light to do it. Usually there is also a sharp turn on, from having no SC to having the SC by tuning the laser power very slightly. By seeding the supercontinuum, a process where you add a bit of light - his group used a pulse with 40,000 times less energy - to get the process started. Not only did they find it works, but it increases the amount of light you get out by a factor of 4 or so. They don't completely understand it yet, but this is a fantastic result, because having a bright light source that is continuously variable over such a broad range of spectrum really opens to door to many experiments, and is something I may be working on in the future.

    Then there were two talks on biology and biological optics. I'm going to save the one by Nicholas Roberts on polarized vision in animals for a later post - this was the research on Mantis Shrimp being able to see circularly polarized light, but there's so much more than just that. Instead I'd like to focus on Hui Cao's work on mimicking nature's optics... and then doing better! You may have heard that butterflies have a wing scale pattern that has very fine microstructure, acting like a diffraction grating and giving them their wing iridescence. Well, it turns out that some birds, and for some colors, have a similar effect that colors their wings. However, while the butterfly wing will seem to change colors as you change viewing angle, this does not happen for the birds. This is a result of having local structure but no large scale structure in the bird wing. By making similar structures, they were able to re-create the effect in the lab. But if that were all it would hardly be entertaining. They went a step further, and placed what are known as quantum dots into their structures, these are small metallic spheres that emit different colors based on how big they are. When they hit this structure with light, it would preferentially amplify a certain frequency - they had created a laser! Hopefully the birds don't figure this one out.

FiO/LS 2011 - Tuesday Sessions


    Wow! Today was absolutely packed and quite exciting. First off I just invented my "Most Amusing Talk" award so I could give it to John Dudley, whose talk (slides available here) was very entertaining. He started off with a case of how he was wrong, then moved into a recount of how he was observing super continuum generation (where you get white light from almost single color laser light using special optical fibers) as a solution to the nonlinear wave equation and couldn't get it published anywhere (Science, Nature, and on down the food chain), but eventually got it into Applied Optics. Now these types of results make the cover of Nature Photonics! He suggested they start the journal "Nature Reinterpretations" which got a good chuckle from the audience.
    This was mixed with a recount of how the first nuclear weapon design (gun type) was not actually tested, but the engineers who were building it had a good idea it would work, so while the physicists were busy testing their bomb (implosion type), the engineers just dropped theirs! I really have no idea how this fit in, but interesting trivia anyway. Another good quote; "Fluid dynamicists were divided into engineers who observed things that could not be explained and mathematicians who explained things that could not be observed …" (Sir James Lighthill). I can think of some other fields, where this is true.
    Finally, he ended by showing just why science is exciting - the solutions they were seeing in their nonlinear optics experiments should have been possible in water (where the equations the optics people used were first developed). Despite searching, no-one had been able to produce the effect in water until the optics folks showed the way. And now we have rogue wave type solitons in water;

    The best part of the day, however, was going by the '"Mission: Optical" Student Chapter Competition'. The goal was to build a project for under $25 (US) that demonstrated an optics principle. So many good and fun ideas - I'll definitely be stealing many of these! My favorites were a balloon stretched across the end of a tin can, the other end was cut off so you could speak into it. A laser pointer was then attached pointing at a mirror (or CD) that was glued to the balloon. When you spoke into it, the balloon drum would vibrate, and the reflected spot would trace out a pattern on the wall. A great way of 'visualizing sound', and much easier, more direct and more robust than having motors drive mirrors to deflect the laser beam. Another group used legos, LED's, CD's and some ingenuity to build a 3D stroboscopic viewer. It almost worked. But it was enough of an ingenious idea, that I'd really like to give them credit for it.
    Other groups used just a bucket of water, sugar and milk to demonstrate as many different optical principles as they could: Reflection and refraction, the later of which changes with the addition of sugar to the water, total internal reflection in the bucket and the addition of milk for scattering. And another had a great setup that really made it easy for students to get into the scientific principle (just don't tell the kids that). They had kids split into groups and try different ways to heat water. Yet another demonstration of just why I think these conferences are awesome - I never would have thought of some of these ideas on my own, but now I can use them to teach others about optics.

FiO/LS 2011 - Personal Experiences

    Today, I gave my first Real Conference Talk. For those of you from a non-science background, a conference talk is essentially a 12 minute window (25 minutes if you're a big-shot) during which you present your cutting edge research to others in your field. You then have 3 (5 for the bigwigs) minutes for questions. Why is this important? Because this is one of those rare times that Ideas get generated. Most of the time you're working in the lab, trying to solve the problem of why your image is out of focus, or unevenly lit, or why you have chirp and where did it come from anyway...? But at a conference the point is to present your research, listen to others talk about their research, look for cool ideas that you could do in your lab, and figure out a way you could do it better, or in a way no-one else could. It's a period of pure thinking and flexing your intellectual muscle. At least that's how I view conferences.

    I lied though, this actually isn't my first first Real Conference Talk. I gave a talk at the 10th International Conference on Non-linear Dynamics. That was back in high-school, and while I took the data and came up with the analysis, the talk was actually handed to me as we were driving to the conference. This talk is still special though, because it's my third year in graduate school, and yet my first conference talk. My research for the last year has not gone quite as well as I planned, but it went, and I have solid (if perhaps somewhat simplistic) data and a solid model to back it up with.

    So I gave a good talk. I know this because I practiced it before hand, tried it out on several members of my group (sometimes multiple times, thank you by the way), thought about the graphical layout of my slides (really this is important, the last thing you want is someone thinking 'oh, great' and pulling out the conference proceedings because he can't read your title from the front row (true story from today)), I thought about the content on the slides and tried to ask myself what was a) wrong with it, b) confusing about it, c) what it could lead to and imply, and d) what does it mean anyway? And then I thought of how to answer those questions.

    I've taught recitation sections and lab sections by now, so I know the look on people's faces when they don't understand something and as I was giving my talk I was seeing (mostly) the opposite of that. I know my message made it through and not just the people in my group complemented me afterwards. So I know it was a good talk.

    Yet I feel as though I just got handed a C. Why? Because despite all the thinking I did beforehand I flubbed the first question. Okay, so I get seriously nervous giving talks, and while my leg no-longer twitches like it used to (although I did do a lap around the conference center afterwards, during the coffee break, thankfully), my heart rate and blood pressure skyrocket whenever I give talks, especially for the question and answer sessions - I can't help it. Back to the story - despite all my thinking about my slides and going over questions and reasoning in my head, when I get that first question I stall. Wait, what? He just said something that I thought I knew how it worked, but apparently I don't, how does it apply here? Does it really apply here, can he clarify, oh yeah sure, go on a tangent... wait... that didn't actually help OR answer the question... stumble... um... anyway.....

    I knew I was going to get this question too. How did I know I was going to get it you ask? Well I just put up a picture the size of the projector screen with a fairly obvious imaging artifact* tiled all over it, duh someone was going to spot it.

    So I had seen this artifact the first time I displayed the image, but at the time I thought, 'hey cool, this is a pretty awesome image!' Then about a couple of days later I thought it could be a mis-alignment of my imaging system (which was mis-aligned, the blasted thing can't stay on straight) which could be causing a preferential direction to emerge. Despite having these two rational arguments I stopped dead in my tracks and flopped like a fish out of water for a minute or so until someone saved me and got in another question.

    So, it was a good talk. It might not have been a Great Talk, but I have a few more years to work on that one. Yeah, I flubbed one question, but I answered the others reasonably well, and the question got some others thinking, and they gave me some great experiments to try, so I really learned a new experimental method from it. Plus it pointed out a hole in my knowledge, I assumed I knew what a certain method was, but apparently not, so I'm now inspired (shamed?) into going back and reading over the methods of my field so I don't get caught off-balance again. I may have hated it, but I'll likely be a better scientist for it. And that's what conferences really are for - making better science.


* It might not be an artifact, I don't think it is, and I realized while I'm out here that I can do a quick experimental check for this when I get back, but for the point of the story it doesn't matter, artifact describes what it looks like.

Bedside Tables - Part I

  After finishing up on the upstairs bench, we decided that the next project would be a pair of matching bedside tables. These are especially needed as we currently only have one bedside table of an awkward height, resulting in both of our alarm clocks resting on the floor. In this post I'll share with you some of our early designs, consideratiins in the design process, and the finnal design we settled on (teaser; I think it is almost something out of Battlestar Galatica).
A quick sketch of the shelves, angles and door.
  We went through a few iterations of the design process, first up was what do the drawers / shelves look like? Our current bedside stand lacks a door, and this is something that we knew we wanted.

  My main concern was not showing that ugly stacked side of the plywood on any side of the table. I knew that there was a way in which I could achieve this without giving up any structural support. At the back of my mind I also knew that it involved canting the legs at a 45 degree angle, but for once I could not visualize it just in my mind, but a quick sketch showed me the path. I think we'll still have some showing from the top shelf, but some trim may be able to help with that.

Here's my detailed dimensions sketch after I measured the space.

  By canting the legs at this angle, the shelves can attach directly to them, and the plywood layers of the walls will terminate into the legs. Further, I think having the legs angled should allowed for more room for the front door to swing open. To top it all off, I think we're really going to like the slightly recessed look on the sides. Oh yeah, and the octagon shape is reminiscent of the trimmed squares of the Battlestar remake.

Anyway, this construction will go in parts as the tables get progressively closer and closer to completion - furniture-making is not our full time job, but our part-time hobby, so most of these large projects take weeks, if not months to finish, but it should be interesting for us to show you how everything comes together.

Matlab Startup (.m)

For those of you who use MATLAB on a regular basis, I'd like to share a trick I use to simplify my life considerably. One of the things I find myself constantly doing is resizing text on figures. I'm always increasing text to 14-16 point font and setting the face to bold. This is okay if you have one figure to make, but when you need to do it to every figure, and there are 10-20 staring back at you?

First you could start by setting the default figure - you can address its properties using 0 (zero) as the figure handle (see below for more on handles). But there's an even easier way! Using startup.m, we can set the defaults so that when MATLAB starts, the font size / face for the graphs will be set. When MATLAB loads, it looks for a script called "startup.m" which it will then execute before giving you control. By placing our overrides for the default figures here, we don't have to enter them in by hand every time we start MATLAB.

Here's how to do it: Open a new script and save it as startup.m in one of the paths MATLAB searches. You can find the paths by going to File -> Set Path. Something like "My Documents\MATLAB\" would be an example path for a Windows user.
Now for the contents of the script. Here's mine;
% startup.m
% Called at MATLAB startup.
% Sets defaults for figures (use 0 for figure handle)
% Adjust figure defaults for better font read-ability

set(0,'DefaultFigureColor',     'white',...
      'DefaultAxesColor',       'white',...
      'DefaultTextFontSize',    16,...
      'DefaultAxesFontSize',    14,...
      'DefaultTextFontWeight',  'bold',...
      'DefaultAxesFontWeight',  'bold');

% Load up my lovely custom colormap that uses black as middle value.
load('MyColormaps');
set(0,'DefaultFigureColormap',mycmap);
clear;
Let's go over each command;
set(0,'DefaultFigureColor', 'white',...,'DefaultTextFontSize',16,'DefaultAxesFontSize',14,...);
If you're not familiar with the get() and set() commands you really should be. These are a great instant-reference when you need something. The syntax is usually get(FigureHandle) and set(FigureHandle,Property,Value). If you're working on only one figure, you can use get(gcf) (get all values for the current figure), a list of properties and values will be displayed to you. If you are working with multiple figures, it is usually best to assign each one a unique handle, so you don't get confused. For example; "myh1 = figure;" assigns the next figure created a handle of "myh1", then you can use get(myh1) and set(myh1,...) to get/set values of that figure.

Now the second group of commands;
load('MyColormaps');
set(0,'DefaultFigureColormap',mycmap);
clear;
This loads a file called "MyColormaps" within which I have saved a colormap, "mycmap" (creative, I know). You don't need this unless you are (like I am) highly unsatisfied with the default colormaps. I'll go over in the future how to make custom colormaps, but you can leave that out of your startup.m for now. Finally, I clear the variables "MyColormaps" has loaded in my workspace (I like having an empty workspace on startup).

I'm always interested in hearing about your tips and tricks when it comes to simplifying life in MATLAB / Mathematica, etc. Give a shout back if you have something you'd like to share.

Weekend Project - The Fountain of Youth

No, I haven't actually found The Fountain of Youth, sorry to disappoint. However we are youthful and we did make a fountain this weekend. Here's the recap of this rather easy weekend project:

Here's step 1: spray any of the pots that aren't waterproof with the waterproofing spray.
While that's drying (it took our brand 24 hours to dry), build a mesh fence to keep the rocks away from the pump - proper flow around the pump is ideal, most pumps have some built in spacing element, but we figured the more the better.
The bricks and mesh also help support the smaller pot, which will sit right on the spout.

We then placed the smaller pot on the spout and filled in the area with the stone pebbles. One of the asthetic things I really wanted was for water to fill the small pot and bubble out of it. When we first turned it on this didn't happen, the water came out of the fountain and then leaked through the hole in the bottom of the pot! We could have caulked up or cemented the hole, but being inclined to not make another trip to the hardware store, I just took a ziploc bag, cut a hole slightly smaller than the spout in it and forced it over the spout. After holding it down with a few rocks, it isn't 100% waterproof, but it slows down the leaking enough that the pot fills up and bubbles over.
 Of course, it would be nice if it were just this easy. However, after installing the first pump we turned the gadget on, and it whined like a banshee without pushing much water. So we drive back to the hardware store, return that pump and buy another one. Immerse this one in water, plug in and... enjoy the mechanical screeching sound. Now we've had enough of this hardware store, after returning the new banshee, we head to the other hardware store across town, find yet another pump, drive back, put this one in the water, and engage it at full speed to hear... gentle bubbling! Finally, the relaxing fountain we were looking forward to. Let this also be a lesson to try out the pump before fully building the fountain and rock around it.
 Here are another couple of pictures of the finished product. We can take off the fountain's bell attachment for even more soft bubbling sounds:

 Tools:
  • Wire cutters
Purchase breakdown:
  • Large tub
  • Small pot
  • Rocks
  • Pump
  • Wire mesh
  • Bricks
  • Can of sealant
Price:
  • Tools: $0 (Pliers and clippers help for the mesh)
  • Supplies: $127
  • Total: $127

Oobleck!

Here's a hands-on experiment that even the kids can try*.
  Oobleck (or corn starch in water) is a "Non-Newtonian fluid". When something tries to move through the oobleck, it tends to stiffen, and make it even more difficult for that object to move through. In the video below, sound waves from the speaker apply little pulses of pressure to the ooblek. Let's see what happens.
  When each pressure pulse (sound wave) is applied, the oobleck stiffens, and then relaxes when the pressure stops. This gives rise to the "fingers" of oobleck forming, then slowly wiggling around and breaking off. Look again at the video and watch the oobleck at the edges of the speaker. When the pieces break off and land on the part of the speaker that is not vibrating they stop stiffening and look almost like a normal liquid.
  Don't forget about the oobleck that's dripping off the edge too! It almost looks like a very thick syrup, similar to molassas. The same physics is happening here as well. As the oobleck slides down itself there's a force that causes it to stiffen up.
  Compare this behavior with plain water in a speaker cone (not responsible for musical tastes):
  Unlike oobleck, water doesn't get stiffer in the same way that oobleck does. If you have a bathtub full of water and you pull your hand through it it's difficult. That's the drag of water resisting you. Now if you drag your hand twice as fast it's just about twice as difficult. That's a Newtonian fluid, for those of you more advanced, it means that the drag of the water is linear in the rate of shear (how fast it flows over your hand).
   If we were to take our bathtub and fill it with oobleck (hypothetically, I wouldn't recommend doing this), we could pull our hand through it as well. Now if we were to drag our hand through it twice as fast, it resists us much more than twice as much. That is to say it gets stiffer as we increase the rate of shear, people call this dilatant.
  Alternatively we could imagine a material where if we were to pull our hand through twice as fast, it would actually be easier! This type of liquid gets softer as we go, or you may hear it as "shear thinning" or pseudoplastic.

  Oobleck is really a fantastically fun recipe and one that's so incredibly simple I really encourage you to do on your own: Mix 1 part water to 1.5 or 2 parts corn starch. Add some food coloring if you'd like. That's it!
  Another do-at-home non-Newtonian fluid recipe is that of Flubber.

*Always exercise caution when working with exposed electrical wiring, such as that which can be found in speakers, subwoofers, and other audio electronics. Children should always be supervised around electricity.

Welcome

Welcome to the lair of a particular mad scientist (technically a mad graduate student). I like coffee, especially a good latte, and even more so the ones I make (it's supposed to be a tree).

I've created this blog with the intent of sharing my enthusiasm for the sciences with you, and hope you learn something neat while here. I plan to discuss research I'm involved in, other current research I find interesting, and also some of my entertaining side science & tech projects. Hopefully I'll get better at discussing science, and you may find some fun experiment that you've never seen before.

In addition to the sciences, my major hobby at the moment is creating furniture with the limited selection of tools I can afford on a stipend. Hence, there will be many woodworking project posts interspersed with science posts.

I think that will be all for today, if you see any neat science out there, or have any other ideas to send me, feel free to contact me at madscientistlair [at] gmail [dot] com.