So the page up and page down keys on my laptop (see my review on the T430s) are next to the directional arrows. This was driving me insane, as I would accidentally hit them and then my view would jump to kingdom come. Thankfully you can remap keys in Linux, and I found autohotkey for Windows. Such a lifesaver. I remapped pgup/pgdn to home and end. That's when I discovered...
How did I not know about HOME and END until now!?!?!
These are fantastic keys, especially since I'm so used to vi/m in Linux, and jumping to the beginning / end of lines to do inserts. It is super-useful to have these keys in Windows. I absolutely love the keyboard layout with the remapping now.
Showing posts with label tips and tricks. Show all posts
Showing posts with label tips and tricks. Show all posts
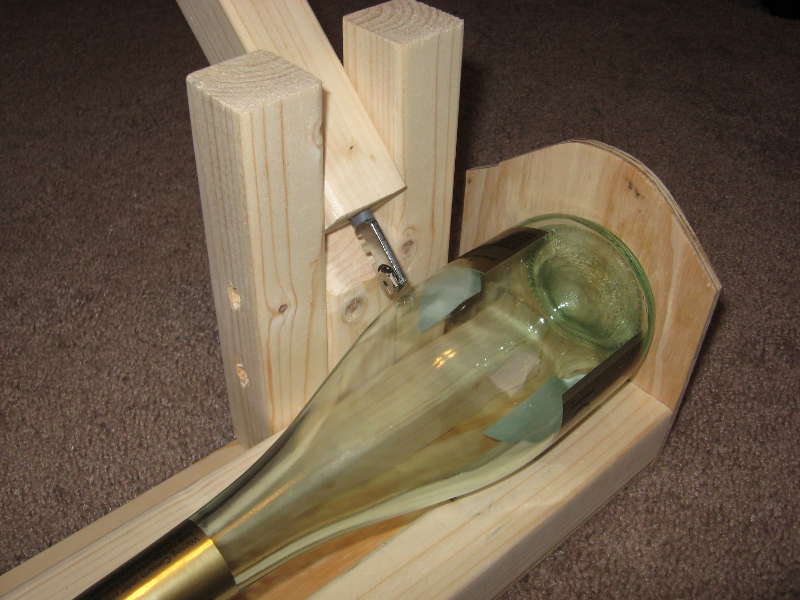
Wine Bottle Cutting Jig
We've been storing up empty wine bottles for awhile. The plan was to recycle them into some artwork - vases, candleholders, etc. Earlier this year, we tried to cut the top off by scoring them with a glass cutter and heat-shocking the glass. The plan didn't work out so well, mainly because the scoring was very uneven, both in pressure and in making an even line around the vase. So while we were able to heat-shock the glass into breaking off, the end result was more effort than it was worth, and not very pretty.
So over the last few months, I've ideas of how to improve the results simmering on my mind. The result is a nifty cutting jig I threw together this weekend:


The idea is simple: a couple of boards to hold the bottle while we rotate it, and a backstop to keep the bottle from sliding back and forth. The glass-scoring tool is seated in a wood block so it's easier to apply pressure.
My favorite part is the peg and hole system I used to allow the tool to cut the bottles at varying heights. The holder / guide for the cutting tool has two pegs at the bottom which pair up with numerous holes along the length of the guide-rail.
 This allows the jig to accommodate bottles of multiple sizes. It doesn't allow for arbitrary distance movements, but the steps are 3/4" apart, so it's close enough for practical purposes.
 As you can see, it makes nice even scoring - perfect for later heat-shocking for cutting the glass.
Tools needed:
Total cost:

So over the last few months, I've ideas of how to improve the results simmering on my mind. The result is a nifty cutting jig I threw together this weekend:


The idea is simple: a couple of boards to hold the bottle while we rotate it, and a backstop to keep the bottle from sliding back and forth. The glass-scoring tool is seated in a wood block so it's easier to apply pressure.
My favorite part is the peg and hole system I used to allow the tool to cut the bottles at varying heights. The holder / guide for the cutting tool has two pegs at the bottom which pair up with numerous holes along the length of the guide-rail.


Tools needed:
- Jigsaw
- Mitre Saw
- Sander
- Power screwdriver / drill
Total cost:
- $7 (Another furring strip and some longer screws.)
EDIT: Here's a schematic of the jig with sizes. The base and backing is 1/4 inch plywood, and the square wood pieces are furring strips. Be sure to take all safety precautions when working with wood, glass, and fire. Click for a larger size.

Bedside Tables - Part IV - Done!
We've finally finished the bedside tables! Here's a quick overview of the final steps, and a few pictures of the final product.
Left out is the cutting of the side panels and the doors. The side panels needed to fit flush, which was achieved by setting the jigsaw at a 45-degree angle for the long cuts along the side (See the picture below). I switched back to a straight cut for curve at the bottom and top of the side panels. The doors also needed straight cuts in for the hinges. After the sanding, staining, and sealing, we had the side panels and doors finished.


Once everything was stained, the doors needed to go on first, as I needed access to get to the hinges. I used quite a few washers to keep the screws from piercing through the thin 1/4 inch plywood.


Here's the final product. The notches in each door, combined with the angled cut, allow them to open almost all the way. The sides are nailed into the shelves with small furniture nails. We're letting them air out in the study for a few days to loose the smell before we bring them upstairs, but other than that, they're finally done!

Here's the price tear down:
Tools:
- Jigsaw
- Mitre Saw
- Power drill / screwdriver
- Sander
- Wood, stain, etc. was left over from the bench.
- Hardware (angle brackets, hinges, door handles, washers): $30
- $30
Home Server - Part II - SSH
Now that we've gotten our Ubuntu server box up and running, it's time to install the tools that will allow us to connect, known as secure shell, or SSH.
Part I - Installing Linux
Part II - Setting up SSH
First up is the install. Bring up a terminal, and use the command "sudo apt-get openssh-server" to install the SSH server. This is the command for Ubuntu, for Fedora, I think it's "yum openssh-server". You may also need to install the client. To check, first issue the command "man ssh" to bring up the manual page (use q to quit), if nothing comes up, then you don't have it installed, "sudo apt-get openssh-client" will do the trick.
That's all for the installation, now let's test out the SSH capabilities. Behind the scenes, after you did the install Ubuntu starts up the ssh service. Later we'll make changes to the ssh files and will need to restart the service, so this will become more clear.
My other computer is a Win XP box (good lord!), and I'm used to PuTTY to connect. We'll start on the local network. Grab the local ip off of the server with the terminal command "ifconfig". It returns a lot of other stuff, but somewhere in there should the be local ip address which looks like "192.168.#.##". Later I'll use the concrete example "192.168.1.21" as the host server. Load up a session of PuTTY and type in this address in the Host Name box, then click on Open. A command window opens that should be prompting you for your username and then password. You can use any of your accounts to test it out, after logging in it will drop you to the Ubuntu command line.
With that working, let's make it a little more secure. Why do we want to make this secure? Here's a great article by the Fedora folks on security precautions and why you want to use them. I particularly liked the examples of the number of attempts to log in as root.
The easiest things you should be able to do are 1) use a strong password on root, 2) change your port number to something non-standard, 3) use SSH 2, 4) deny root the ability to log in, and 5) use key authentication. I would recommend you implement all of Fedora's guidelines (if applicable), but I'll cover these four in more depth.
Assuming you can take care of #1 on your own, here's how to handle number's 2-4. On the linux box, use the command "sudo vi etc/ssh/sshd_config". This opens up a text editor (called vi, see here for a list of commands) and shows the preferences file for the ssh server. Find and edit the text lines;
Now we'll set up key authentication, replacing the user-id and password scheme. This makes you system less vulnerable to brute force attempts. Instead of trying a common name "root" and a bunch of passwords "", "password", etc. SSH will confirm you identity with a public/private key pair. This is actually how SSH transmits all it's data anyway, so your login will be as secure as the channel (or your computer). What happens in this scheme, is that you generate two "keys" one is called the private key - only you have the private key, and it identifies exactly who you are. The second is the public key, which you can give out to anyone! If you want someone to know that it is you at the other end, you encrypt a message (say "Hello world") with your private key. You send it to them, and they decrypt it with the public key you gave them, they see "Hello world" and know it's you. Why? Because if someone else had encrypted the message with her private key, gibberish would result on the output. Moreover, knowledge of the public key doesn't let someone know what your private key is. So as long as your private key is private, you can encrypt messages with it, and if they're decipherable, then the other party knows it is you at the other end. Of course there are drawbacks to this method - you could compute every possible private/public key pair, and then if someone knows your public key, they also have your private key. But if you make the keys longer, then it becomes much more difficult to compute every pair, and the system remains secure.
I found this link extremely helpful in setting up key authentication using PuTTY and won't try to reproduce his work here; http://www.howtoforge.com/ssh_key_based_logins_putty_p2. Also be sure to encrypt (password protect) your private key, as if anyone gets their hands on your private key file they could impersonate you. Password protecting it gives you another layer of defense. For linux, you can use the command "ssh-keygen -t rsa" to generate the key pairs. Same steps apply for registering your public key with the server.
Once you have key based logins on all of your computers, we can turn off username / password login. Open your config file again; "sudo vi etc/ssh/sshd_config", and change the following lines;
So all this allows us to ssh into our server while on the same network, but what if we want to get to our files while on a different network, a friend's house or at work? Nowadays most IP addresses dynamically assigned and recycled, so we'll use Dynamic DNS (domain name system) to create a easy to remember web address for our server. I chose to use the FreeDNS service, although others exist, like OpenDNS and DynDNS is another popular one. For example, you sign up for a sub-domain, the "madscientistlair" part of "madscientistlair.blogspot.com". Then you use as the host name field in PuTTY, "madscientistlair.blogspot.com" and the DNS service says "Oh, you really want; 245.324.3.564", which is the current IP address your ISP has given your home. PuTTY connects to this instead, which goes to your router, which knows that requests for port 1986 should be sent to "192.168.1.21" and you connection to your server is made.
The second part is installing a client to keep the Dynamic DNS servers updated. On my Ubuntu box, I used ddclient, installing with "sudo apt-get install ddclient". On setup, it prompts you for the service you're using. For more information check out the Ubuntu community page. Your router may support one of these services, go to your router web administration tools and then there's usually a Dynamic DNS tab.
One other important step, and you may have noticed this above. How does the router know that you want to talk to the server computer? First it's useful to set a static IP for the server, this way the address "192.168.1.21" that we've been connecting to from home doesn't change in the middle of the night and we can no longer get to our server. The second is to set up port forwarding. There are usually tabs for both in the web administration tools for your router. Since these vary wildly, I can't give you any more advice other than on the port forwarding page, you want to have 1986 (or whatever SSH port number you specified in the sshd_config file) point to your server; 192.168.1.21. To check that it's working, go to http://canyouseeme.org/ and give it your port number. Below their ad, you'll see the result.
There was one file issue I ran into. I could use "madscientistlair.blogspot.com" to talk to my server when I was outside of the house, but not when I was in the house! It turns out that some classes of routers don't allow you to do this. Essentially they prevent you from talking to a local machine through an outside connection. Kinda like using your cellphone to call you grandma in Florida so she can call the home phone. To get around this you'll have to have a batch script on your desktop that edits your windows "hosts" file when you switch locations. For example, you could have two scripts "set_when_home.bat" and "set_when_away.bat". You run set_when_home, when you're home, and this tells windows that when PuTTY asks to connect to "madscientistlair.blogspot.com" it really wants to connect to "192.168.3.564". When you're away, you run set_when_away, and it undoes this change. See here for a couple of example hosts files.
Well that's it. We've installed SSH into our server, secured it, and allowed access from the outside. If you have any lingering questions, or can't get something to work, leave a comment and I'll try to help.
Part I - Installing Linux
Part II - Setting up SSH
First up is the install. Bring up a terminal, and use the command "sudo apt-get openssh-server" to install the SSH server. This is the command for Ubuntu, for Fedora, I think it's "yum openssh-server". You may also need to install the client. To check, first issue the command "man ssh" to bring up the manual page (use q to quit), if nothing comes up, then you don't have it installed, "sudo apt-get openssh-client" will do the trick.
That's all for the installation, now let's test out the SSH capabilities. Behind the scenes, after you did the install Ubuntu starts up the ssh service. Later we'll make changes to the ssh files and will need to restart the service, so this will become more clear.
My other computer is a Win XP box (good lord!), and I'm used to PuTTY to connect. We'll start on the local network. Grab the local ip off of the server with the terminal command "ifconfig". It returns a lot of other stuff, but somewhere in there should the be local ip address which looks like "192.168.#.##". Later I'll use the concrete example "192.168.1.21" as the host server. Load up a session of PuTTY and type in this address in the Host Name box, then click on Open. A command window opens that should be prompting you for your username and then password. You can use any of your accounts to test it out, after logging in it will drop you to the Ubuntu command line.
With that working, let's make it a little more secure. Why do we want to make this secure? Here's a great article by the Fedora folks on security precautions and why you want to use them. I particularly liked the examples of the number of attempts to log in as root.
The easiest things you should be able to do are 1) use a strong password on root, 2) change your port number to something non-standard, 3) use SSH 2, 4) deny root the ability to log in, and 5) use key authentication. I would recommend you implement all of Fedora's guidelines (if applicable), but I'll cover these four in more depth.
Assuming you can take care of #1 on your own, here's how to handle number's 2-4. On the linux box, use the command "sudo vi etc/ssh/sshd_config". This opens up a text editor (called vi, see here for a list of commands) and shows the preferences file for the ssh server. Find and edit the text lines;
Port 22 -> Port NNNNThe right side of the arrow is what it should read when you're done. For port numbers, the most common are; 22 (SSH) 2222 (alternative SSH), 80 (webserver) 8080 (alternative webserver). So we'll pick an unused port say 1986. You can check it against this list, but it's not required that you pick something not on there, the max you can choose is 65535 (I think). Now if you try to use PuTTY to log-in again, you can't. We have to specify the port as well, the field directly right of the Host Name. With this you should be back to logging in just fine.Protocol 2,1 -> Protocol 2PermitRootLogin yes -> PermitRootLogin no
Now we'll set up key authentication, replacing the user-id and password scheme. This makes you system less vulnerable to brute force attempts. Instead of trying a common name "root" and a bunch of passwords "", "password", etc. SSH will confirm you identity with a public/private key pair. This is actually how SSH transmits all it's data anyway, so your login will be as secure as the channel (or your computer). What happens in this scheme, is that you generate two "keys" one is called the private key - only you have the private key, and it identifies exactly who you are. The second is the public key, which you can give out to anyone! If you want someone to know that it is you at the other end, you encrypt a message (say "Hello world") with your private key. You send it to them, and they decrypt it with the public key you gave them, they see "Hello world" and know it's you. Why? Because if someone else had encrypted the message with her private key, gibberish would result on the output. Moreover, knowledge of the public key doesn't let someone know what your private key is. So as long as your private key is private, you can encrypt messages with it, and if they're decipherable, then the other party knows it is you at the other end. Of course there are drawbacks to this method - you could compute every possible private/public key pair, and then if someone knows your public key, they also have your private key. But if you make the keys longer, then it becomes much more difficult to compute every pair, and the system remains secure.
I found this link extremely helpful in setting up key authentication using PuTTY and won't try to reproduce his work here; http://www.howtoforge.com/ssh_key_based_logins_putty_p2. Also be sure to encrypt (password protect) your private key, as if anyone gets their hands on your private key file they could impersonate you. Password protecting it gives you another layer of defense. For linux, you can use the command "ssh-keygen -t rsa" to generate the key pairs. Same steps apply for registering your public key with the server.
Once you have key based logins on all of your computers, we can turn off username / password login. Open your config file again; "sudo vi etc/ssh/sshd_config", and change the following lines;
   ChallengeResponseAuthentication no
   PasswordAuthentication no

UsePAM no
So all this allows us to ssh into our server while on the same network, but what if we want to get to our files while on a different network, a friend's house or at work? Nowadays most IP addresses dynamically assigned and recycled, so we'll use Dynamic DNS (domain name system) to create a easy to remember web address for our server. I chose to use the FreeDNS service, although others exist, like OpenDNS and DynDNS is another popular one. For example, you sign up for a sub-domain, the "madscientistlair" part of "madscientistlair.blogspot.com". Then you use as the host name field in PuTTY, "madscientistlair.blogspot.com" and the DNS service says "Oh, you really want; 245.324.3.564", which is the current IP address your ISP has given your home. PuTTY connects to this instead, which goes to your router, which knows that requests for port 1986 should be sent to "192.168.1.21" and you connection to your server is made.
The second part is installing a client to keep the Dynamic DNS servers updated. On my Ubuntu box, I used ddclient, installing with "sudo apt-get install ddclient". On setup, it prompts you for the service you're using. For more information check out the Ubuntu community page. Your router may support one of these services, go to your router web administration tools and then there's usually a Dynamic DNS tab.
One other important step, and you may have noticed this above. How does the router know that you want to talk to the server computer? First it's useful to set a static IP for the server, this way the address "192.168.1.21" that we've been connecting to from home doesn't change in the middle of the night and we can no longer get to our server. The second is to set up port forwarding. There are usually tabs for both in the web administration tools for your router. Since these vary wildly, I can't give you any more advice other than on the port forwarding page, you want to have 1986 (or whatever SSH port number you specified in the sshd_config file) point to your server; 192.168.1.21. To check that it's working, go to http://canyouseeme.org/ and give it your port number. Below their ad, you'll see the result.
There was one file issue I ran into. I could use "madscientistlair.blogspot.com" to talk to my server when I was outside of the house, but not when I was in the house! It turns out that some classes of routers don't allow you to do this. Essentially they prevent you from talking to a local machine through an outside connection. Kinda like using your cellphone to call you grandma in Florida so she can call the home phone. To get around this you'll have to have a batch script on your desktop that edits your windows "hosts" file when you switch locations. For example, you could have two scripts "set_when_home.bat" and "set_when_away.bat". You run set_when_home, when you're home, and this tells windows that when PuTTY asks to connect to "madscientistlair.blogspot.com" it really wants to connect to "192.168.3.564". When you're away, you run set_when_away, and it undoes this change. See here for a couple of example hosts files.
Well that's it. We've installed SSH into our server, secured it, and allowed access from the outside. If you have any lingering questions, or can't get something to work, leave a comment and I'll try to help.
Matlab Startup (.m)
For those of you who use MATLAB on a regular basis, I'd like to share a trick I use to simplify my life considerably. One of the things I find myself constantly doing is resizing text on figures. I'm always increasing text to 14-16 point font and setting the face to bold. This is okay if you have one figure to make, but when you need to do it to every figure, and there are 10-20 staring back at you?
First you could start by setting the default figure - you can address its properties using 0 (zero) as the figure handle (see below for more on handles). But there's an even easier way! Using startup.m, we can set the defaults so that when MATLAB starts, the font size / face for the graphs will be set. When MATLAB loads, it looks for a script called "startup.m" which it will then execute before giving you control. By placing our overrides for the default figures here, we don't have to enter them in by hand every time we start MATLAB.
Here's how to do it: Open a new script and save it as startup.m in one of the paths MATLAB searches. You can find the paths by going to File -> Set Path. Something like "My Documents\MATLAB\" would be an example path for a Windows user.
Here's how to do it: Open a new script and save it as startup.m in one of the paths MATLAB searches. You can find the paths by going to File -> Set Path. Something like "My Documents\MATLAB\" would be an example path for a Windows user.
Now for the contents of the script. Here's mine;
% startup.m
% Called at MATLAB startup.
% Sets defaults for figures (use 0 for figure handle)
% Adjust figure defaults for better font read-ability
set(0,'DefaultFigureColor', 'white',...
'DefaultAxesColor', 'white',...
'DefaultTextFontSize', 16,...
'DefaultAxesFontSize', 14,...
'DefaultTextFontWeight', 'bold',...
'DefaultAxesFontWeight', 'bold');
% Load up my lovely custom colormap that uses black as middle value.
load('MyColormaps');
set(0,'DefaultFigureColormap',mycmap);
clear;
Let's go over each command;
set(0,'DefaultFigureColor', 'white',...,'DefaultTextFontSize',16,'DefaultAxesFontSize',14,...);
If you're not familiar with the get() and set() commands you really should be. These are a great instant-reference when you need something. The syntax is usually get(FigureHandle) and set(FigureHandle,Property,Value). If you're working on only one figure, you can use get(gcf) (get all values for the current figure), a list of properties and values will be displayed to you. If you are working with multiple figures, it is usually best to assign each one a unique handle, so you don't get confused. For example; "myh1 = figure;" assigns the next figure created a handle of "myh1", then you can use get(myh1) and set(myh1,...) to get/set values of that figure.
Now the second group of commands;
I'm always interested in hearing about your tips and tricks when it comes to simplifying life in MATLAB / Mathematica, etc. Give a shout back if you have something you'd like to share.
Now the second group of commands;
load('MyColormaps');This loads a file called "MyColormaps" within which I have saved a colormap, "mycmap" (creative, I know). You don't need this unless you are (like I am) highly unsatisfied with the default colormaps. I'll go over in the future how to make custom colormaps, but you can leave that out of your startup.m for now. Finally, I clear the variables "MyColormaps" has loaded in my workspace (I like having an empty workspace on startup).
set(0,'DefaultFigureColormap',mycmap);
clear;
I'm always interested in hearing about your tips and tricks when it comes to simplifying life in MATLAB / Mathematica, etc. Give a shout back if you have something you'd like to share.
Subscribe to:
Posts (Atom)