T60 Screen Power Inverter Replacement

Sometimes you fix things, and they don't turn out fixed. This is one of those stories.

I have this old Thinkpad T60 (circa 2004 - they built these things well), where windows finally gave up the ghost on this fellow, so I put on Ubuntu, but it consistently had issues with the screen - after a few minutes of operation the backlight would go out. I thought that the screen power inverter might be the problem.

It wasn't, but it was still a fun replacement, so I thought I would share:

Equipment :
  • laptop (unplugged and with battery removed)
  • Screwdrivers
  • new power inverter


Screw locations - four on the front and a few on the sides.
They're hidden behind small black covers, you can use a flat
screwdriver to pry them off.


Here we are with the screws removed, you can pull up on the
screen-front to reveal the power inverter - the green and
white strip at the bottom.

It pulls right out and you can swap it with the new one.
One side connects with the screen, and the other with the chassis
Reverse steps to get back to working laptop.

Lenovo T430s Review

Disclaimer: This is not a particularly serious or comprehensive review. Rather, it is a collection of my usage notes than anything else. Also, I'm not being paid by Lenovo to say any of this.

A little background and perspective on where I'm coming from.
My last laptop was a Lenovo T60 bought circa 2007, and manufactured around 2006 (I purchased it refurbished). It came with Windows XP, and I drove it into the ground. About a year ago, XP finally gave up the ghost, and instead of doing a clean XP re-install I loaded it with Ubuntu. It functioned fine for a few months and then the power inverter to the display gave out. This seems to be a common problem. While I'll probably get around to fixing this (and yes, a post will be in order on that), the T60 is now serving as an office desktop, and I decided that it would be a good idea to upgrade to a new laptop.

After looking at the current models of Lenovo laptops, I settled on the T430s - good specs and lightweight. I ended up getting another refurbished model from their outlet. Here are the specs;

Windows 7 Home Premium
CPU: Intel Core i5-3210M @ 2.50GHz x64
RAM: 4.00 GB
HDD: 320 GB
Graphics (integrated): Intel HD 4000
Graphics (descrete): NVIDIA NVS 5200M
Display: 1366x768


I'm dual-booting Win7 and Ubuntu using the instructions at LinuxBSDos. Linux installed seamlessly, but be sure to make a windows recovery disk before you do this! I left my recovery partition well enough alone as well. Finally, I had some issues getting the Windows updates to apply (unrelated I think), and fixed it with these instructions.


Usage notes:
  • I was pretty skeptical about the keyboard - I've tried a couple of chicklet style keyboards and haven't been impressed (Apple and Asus - full disclosure, I'm not much of an Apple fan-boy, but neither do I have a bone to pick with them). The reviews were pretty positive about this one (although less so on the e-series, so be warned), so I thought I would give it a chance. The keys have enough travel, are well separated, and the mechanism behind each key is solid. I thought the curved shape to the top was mainly bogus, but my hand does feel much more centered on the home row than with the flat Apple keys. I ocassonally use the home/end/pgup/pgdown group, but am not bothered by their separation on the keyboard. After getting used to ViM, I really want to use this keyboard for complete computer navigation. It lives up to the hype.

  • I'm less positive about the widescreen (although it's rare to get a laptop without this anymore). Personally, I feel as though it makes me hunch over more, since the center of mass of the screen is lower. It's not noticable when it's on your lap, but rather when you're using it on a desk.
  • Also, I'm not much of a fan of the trackpad. The T60's trackpad was perfect - I could use it for days without  having my hand hurt. The 430s... well, after using it for most of today, I feel like I'm developing claw-hand. It has some nice two finger scrolling and three finger tap / swipe actions that work well. I'm not entirely sure what the problem I have with them is. I've noticed this with my wife's Lenovo V600 too. At first I thought it had to do with how recessed the trackpad was, however, now I'm thinking that it has to do with how large it is. I usually have my thumb resting on the left mouse button, and in order to keep the other fingers from registering, I have to arc my index finger far away from them, or constantly hold up my middle finger. The trackpoint (red pointer in the keyboard) feels much better, but I can't keep myself away from the trackpad long enough to give it enough time to form an opinion. I'm thinking I'll have to get an external mouse with this one.
    Added: So I've this for about a week now, but wanted to leave my initial impressions up. It still hurts my hand to use the mouse for extended periods of time, but not quite as much. I've gotten much better at the multiple finger gestures and really enjoy using them. I would still recommend an external mouse for the long haul. Also, I've encountered the first, and hopefully only, problem I've had with this refurbished machine - the right trackpad mouse button has died. This isn't that much of a big deal, I can just jump up and use the trackpoint's rmb, but it's not an ideal situation either.
I think the size of the trackpad may be responsible for my 'claw' feelings.
At last, that combined with my propensity to use the left side of the trackpad
(you can make out where my fingers have been on the T60).

  • The battery life seems good. I got about 4.75-5 hrs of word processing with the internet up, and 1.5 hrs of graphics-heavy Mass Effect 3. This brings up a good point - you do have to make sure the power plug is fully seated into the machine - that's how I have the numbers for ME3 - I didn't fully seat the power cable :p.
  • Sounds are great, the speakers are now next to the keyboards and pointing up. They sound rich enough for me, but that's not saying much, I'm not exactly an audiophile.
  • Graphics-wise it does what I've asked of it so far, which is to say the occasional Starcraft II and Mass Effect 3 :p. And runs pretty cool while doing that.
  • Other notes: I would not pick it up from the right (CD tray side) while burning a CD. The tray is a bit thin and it killed a burn I had going from the little bit of case-flex it does have. These are magnesium cases and are supposed to be quite strong, though. Judging from the number of times I've dropped the T60 that sounds about right.
Here are some more comparison photos:

Top view, and front view, the T430s is slimmer in the front
but builds towards the back to about the same thickness.

Thankfully, it has the same matte screen that prevents reflections.


All in all, it seems to be a solid laptop, and I'm really quite looking forward to using it.

Does anyone else have problems with the new Lenovo trackpads? I'd like to know what your solutions are, two handed? Middle finger navigation? Finger exercises? A hack that lets you use the webcam as a mouse?

Ubuntu on the T60

    I've had a Lenovo T60 laptop that's been running Windows XP for the last few years, and it's slowly gone downhill. I finally decided to do a clean linux install when I found the \Windows folder in the recycle bin with no way of removing it (I had previously messed up the PATH environment variable, and have had constant empty message boxes popping up from "Lenovo Recovery"). So this posts will chronicle the task of bringing my laptop up to speed as a working machine with Linux (specifically Ubuntu).

1) Install Ubuntu
    This step one would think would be easy, but unfortunately, the Radeon X1400 card I had in the laoptop doesn't play nice with the Ubuntu installer. Turns out you have to force it into a basic mode, and later you can install an open-source driver for it. Otherwise it leaves the computer with a black screen after you start the install, and ends up going nowhere. To get around this when installing, modify the install line before the "-" to look like;
... noquiet nosplash radeon.modeset=0 ...
The specific details are on this mailinglist.
    This also means that I had to install the open source Radeon drivers after boot. You can also install the fglx proprietary drivers from AMD, but that seemed to be more involved than this fix. To get the open source drivers couldn't be easier - just go to the Ubuntu Software center and search for "Radeon". The result that reads "ATI binary X.Org driver" is the one you want.

2) Prevent Overheating
    This required tweaks in a few different areas. The first is telling Ubuntu that it can use the power saving features of the motherboard. This is done by editing the grub startup file (note, if you motherboard / bios is too horribly old, it may not support this feature. Unlikely, but possible). I followed the instructions below this video, which also exist elsewhere (but I lost the link).
    Second, I installed a lightweight power manager (see here for instructions). This is similar to the power scheme manager that often comes OEM with laptops. Called Jupiter, it allows for different power settings - I found "Performance -> Power on demand" suited my needs well . It also enables me to turn on/off bluetooth/wifi/trackpad and the external display. Bluetooth can be a real power eater, and I find having the external display off really keeps the laptop cool.
    Finally... I cleaned out the fan. I didn't think I needed to, but I noticed that there wasn't much air blowing out of it. A few spurts of the compressed air can later the fan was going full-tilt and doing a nice job of keeping the laptop cool.

3) Dropbox & Office Install
    Despite their attempts to make life much easier for you, I found the dropbox installer to be one of the hariest parts of this entire process. It wouldn't install from the Ubuntu Software Center, nor would it install from the command line. Either route would end up with a 99% downloaded.... message until my patience ran out. The solution was to grab the .deb installer from their website. Install that with dpkg, and then once it started configuring, cancel out and install the dropbox daemon and restart. The specific commands can be found on post #8 here.
    Okay, so I'm not always a fan of Microsoft, but I do think the got Office 90% right. OpenOffice.org is a great alternative, but is ~60% of the way to being a great Word / PowerPoint replacement in my book, so I (unfortunately) had to install Office. Thankfully my school offers copies for school/work, so I was able to get one from them. Using Play on Linux (PoL) - which is a great wrapper program for Wine (a collection of windows libraries that allow windows programs to play on linux) - I downloaded the installer and ran the PoL install script. The only hang-up was that the windows installer was a .exe file, and the PoL install script wanted a CD. As it turns out, that installer wasn't actually a binary executable, but an archive renamed to a .exe. Archive manager was able to open it up, and after extracting it to a folder, PoL was quite happy to install it.
    My university offers a download of office for students. The only minor change I had to make was renaming the installer extension to either .iso or .exe (it was something else obscure), then the PoL installer was able to recognize it and install it for me.

4) Install other services
    No other programs gave me much trouble (ssh, svn, eclipse, matlab, etc.). Network printing with the ubuntu server was a breeze as well.

And there you have it, a snappy 'new' laptop.

How about you all? Brought an old machine back to life with a linux distribution? Which one did you choose? Have any trouble?

From 2012 into 2013

Incidentally, this is one in the best series
of Hallmark ornaments ever.
I just thought I would let everyone know that this blog is still active going into the new year. It's still very much an experiment, but I think I'll keep it up.

I've been going back over the site views (and comments, yeehaw!!), and it seems like the woodworking and diy projects are very popular. You can certainly count on more of them! This is still mainly an outlet for all of my random projects, though. Consequently you can expect some computer related articles, some woodworking and diy projects, and the new experiment will be to take scientific journal articles and write explanations of them about once a month.

I'm looking forward to the new year, and the new projects to come!

Weekend Project - Wine Bottle Torches

We had seen these blue wine bottles turned tiki-torches in various corners of the internet, and decided that they would look great on our back porch (and might even keep the bugs away too). So a quick trip to the hardware store netted the required components for a hair under $25 (nearly half was in the $10 torch fuel). The hardest part of the construction was in removing the wine bottle labels - but repeated soaking in warm, soapy water and scrubbing with rubbing alcohol removed them to our satisfaction. Here are the photos of them in use (we have one hanging up and one on the table);
Tools:
  • Screwdriver
  • Teflon tape
  • Lighter
Cost:
  •  $25 (fuel, hardware, teflon tape - no wine bottles)


Backyard Table

    We've been on a scrap-wood kick - trying to get rid of the extra plywood we have with some useful projects. One of these is a table for the backyard patio. The fountain turned our backyard into a nice oasis to chill out in, but it was still lacking something. Primarily a table, so that our back-porch picnics would have somewhere to put the food instead of just on our laps.
    In our characteristic fashions, the Mr. wanted to just screw some plywood together, stain and seal it, and then call it a day. But the Mrs. had some more vibrant ideas, and after a quick trip to the local hardware store, we came back with some tile and mastic. Here's the story of the backyard table.

    We cut out an (almost) equilateral triangle from one of the plywood scraps, rounded the corners, and sanded it to a nice finish. After this came two coats of stain and sealer.
     Next we laid the tile out on the wood, marked the edges, and cut the tile with a Dremel equipped with a diamond cutting wheel (sorry no picture). This process took awhile, and should also be completed with proper safety precautions (safety goggles, dust-mask, and gloves).


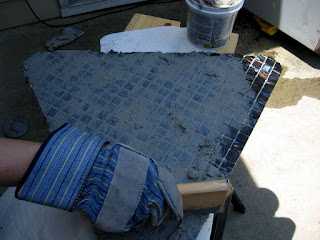
    Next up was the mastic and grout - a thin layer of mastic was applied on the surface of the wood, and we pressed the tiles into that. Once it had dried (24 hrs) we applied the grout to the tiles. We needed to start at the center tiles and work our way to the edges to allow the edge tiles some time to set. This way we didn't knock all the grout off when cleaning the tile surfaces. Moistening the cloth helped remove the drier grout from the top of the edge tiles.

    After that the legs were attached with some hardware that we had laying around from when we built the bench. The screws going into the table-top are 1/4 inch plywood screws. With the metal bracket, they barely avoid going through the plywood.


    With a couple of coats of grout sealer, we had a final product! The table nestles nicely between the two chairs when we have them angled towards the fountain, and is matched in height to the arms, so it's easy to use.

Tools:
  • Mitre saw
  • Jig saw
  • Power screwdriver ./ drill
  • Dremel
  • Protective devices (goggles, dust mask, gloves)
Cost:
  • $10 Tile
  • $5 Mastic
  • $0 Existing wood, screws.

Wine Bottle Cutting Jig

    We've been storing up empty wine bottles for awhile. The plan was to recycle them into some artwork - vases, candleholders, etc. Earlier this year, we tried to cut the top off by scoring them with a glass cutter and heat-shocking the glass. The plan didn't work out so well, mainly because the scoring was very uneven, both in pressure and in making an even line around the vase. So while we were able to heat-shock the glass into breaking off, the end result was more effort than it was worth, and not very pretty.
    So over the last few months, I've ideas of how to improve the results simmering on my mind. The result is a nifty cutting jig I threw together this weekend:


The idea is simple: a couple of boards to hold the bottle while we rotate it, and a backstop to keep the bottle from sliding back and forth. The glass-scoring tool is seated in a wood block so it's easier to apply pressure.

My favorite part is the peg and hole system I used to allow the tool to cut the bottles at varying heights. The holder / guide for the cutting tool has two pegs at the bottom which pair up with numerous holes along the length of the guide-rail.
This allows the jig to accommodate bottles of multiple sizes. It doesn't allow for arbitrary distance movements, but the steps are 3/4" apart, so it's close enough for practical purposes.
As you can see, it makes nice even scoring - perfect for later heat-shocking for cutting the glass.

Tools needed:

  • Jigsaw
  • Mitre Saw
  • Sander
  • Power screwdriver / drill

Total cost:

  • $7 (Another furring strip and some longer screws.)

EDIT: Here's a schematic of the jig with sizes. The base and backing is 1/4 inch plywood, and the square wood pieces are furring strips. Be sure to take all safety precautions when working with wood, glass, and fire. Click for a larger size.